This Google Sheet file's main purpose is to manage Watchlist and support fellow Researchers.
It is a miniature version of Defillama and helps you quickly grasp information about many projects in a single interface.
» File: https://docs.google.com/spreadsheets/d/1PHbDLboND2wz2MuG4KKi6hSkP7L0IvDQJKool8IiYr4/edit?usp=sharing
INITIAL SETUP AND USE INSTRUCTIONS
Initial setup steps:
Sign up for a Coinmarketcap API account
Clone the file for personal use
Create Trigger to automatically update data
Add your “token slug” and start using it
STEP 1: REGISTER FOR A COINMARKETCAP API ACCOUNT
The file will automatically update data from two sites: Coinmarketcap and Defillama.
Defillama allows data retrieval without registration so skip it. Coinmarketcap requires an API KEY so you need to register for a FREE account.
Visit the Coinmarketcap API website here: https://coinmarketcap.com/api/
Click the Get Your API Key Now button and follow the instructions to register an account. While registering, in the Plan section, just select Basic - Free basic access for personal use. Go to your email to register and press Verify to complete.
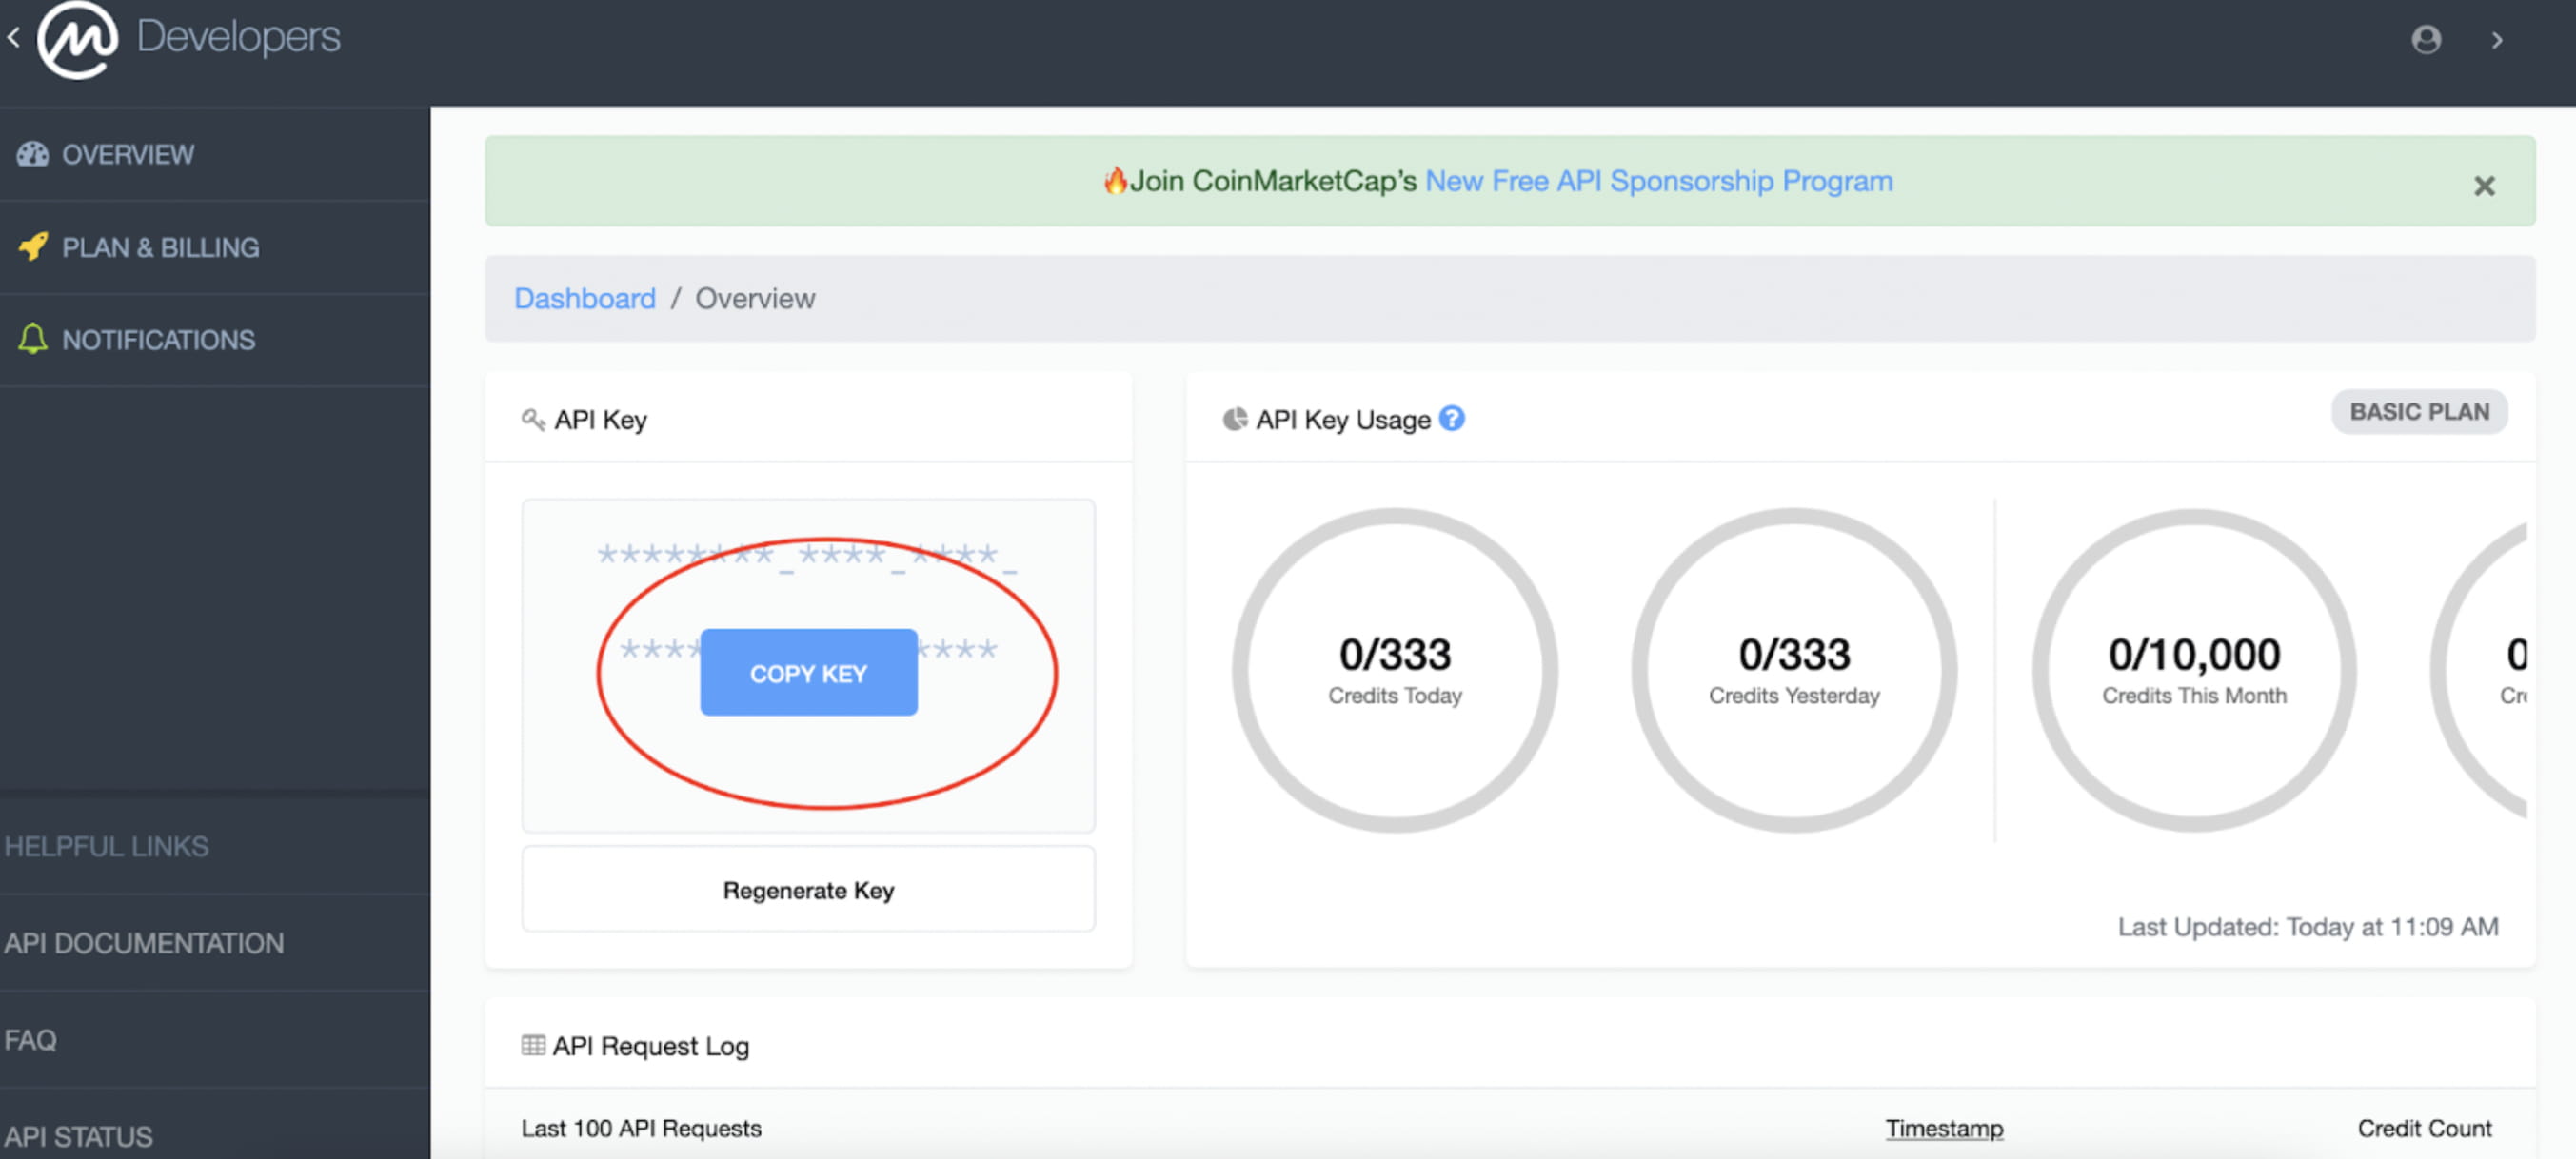
After registration is complete, you will see the Account interface. Move the mouse to the API Key box and the Copy button will appear. Copy this API Key to use in the next step.
Also, you see, Coinmarketcap limits data retrieval to 333 times a day and 10,000 times a month. Once F5, there are 2 requests sent to Coinmarketcap to get data, so you should only F5 about 150 times a day, more than that, you won't be able to update the data anymore and have to wait until the next day (probably not even one day). F5 Watchlist more than 100 times, right 😆).
BƯỚC 2: CLONE FILE WATCHLIST TEMPLATE
Go back to the Google Sheet: Watchlist Manager Template file that I shared to clone the file.
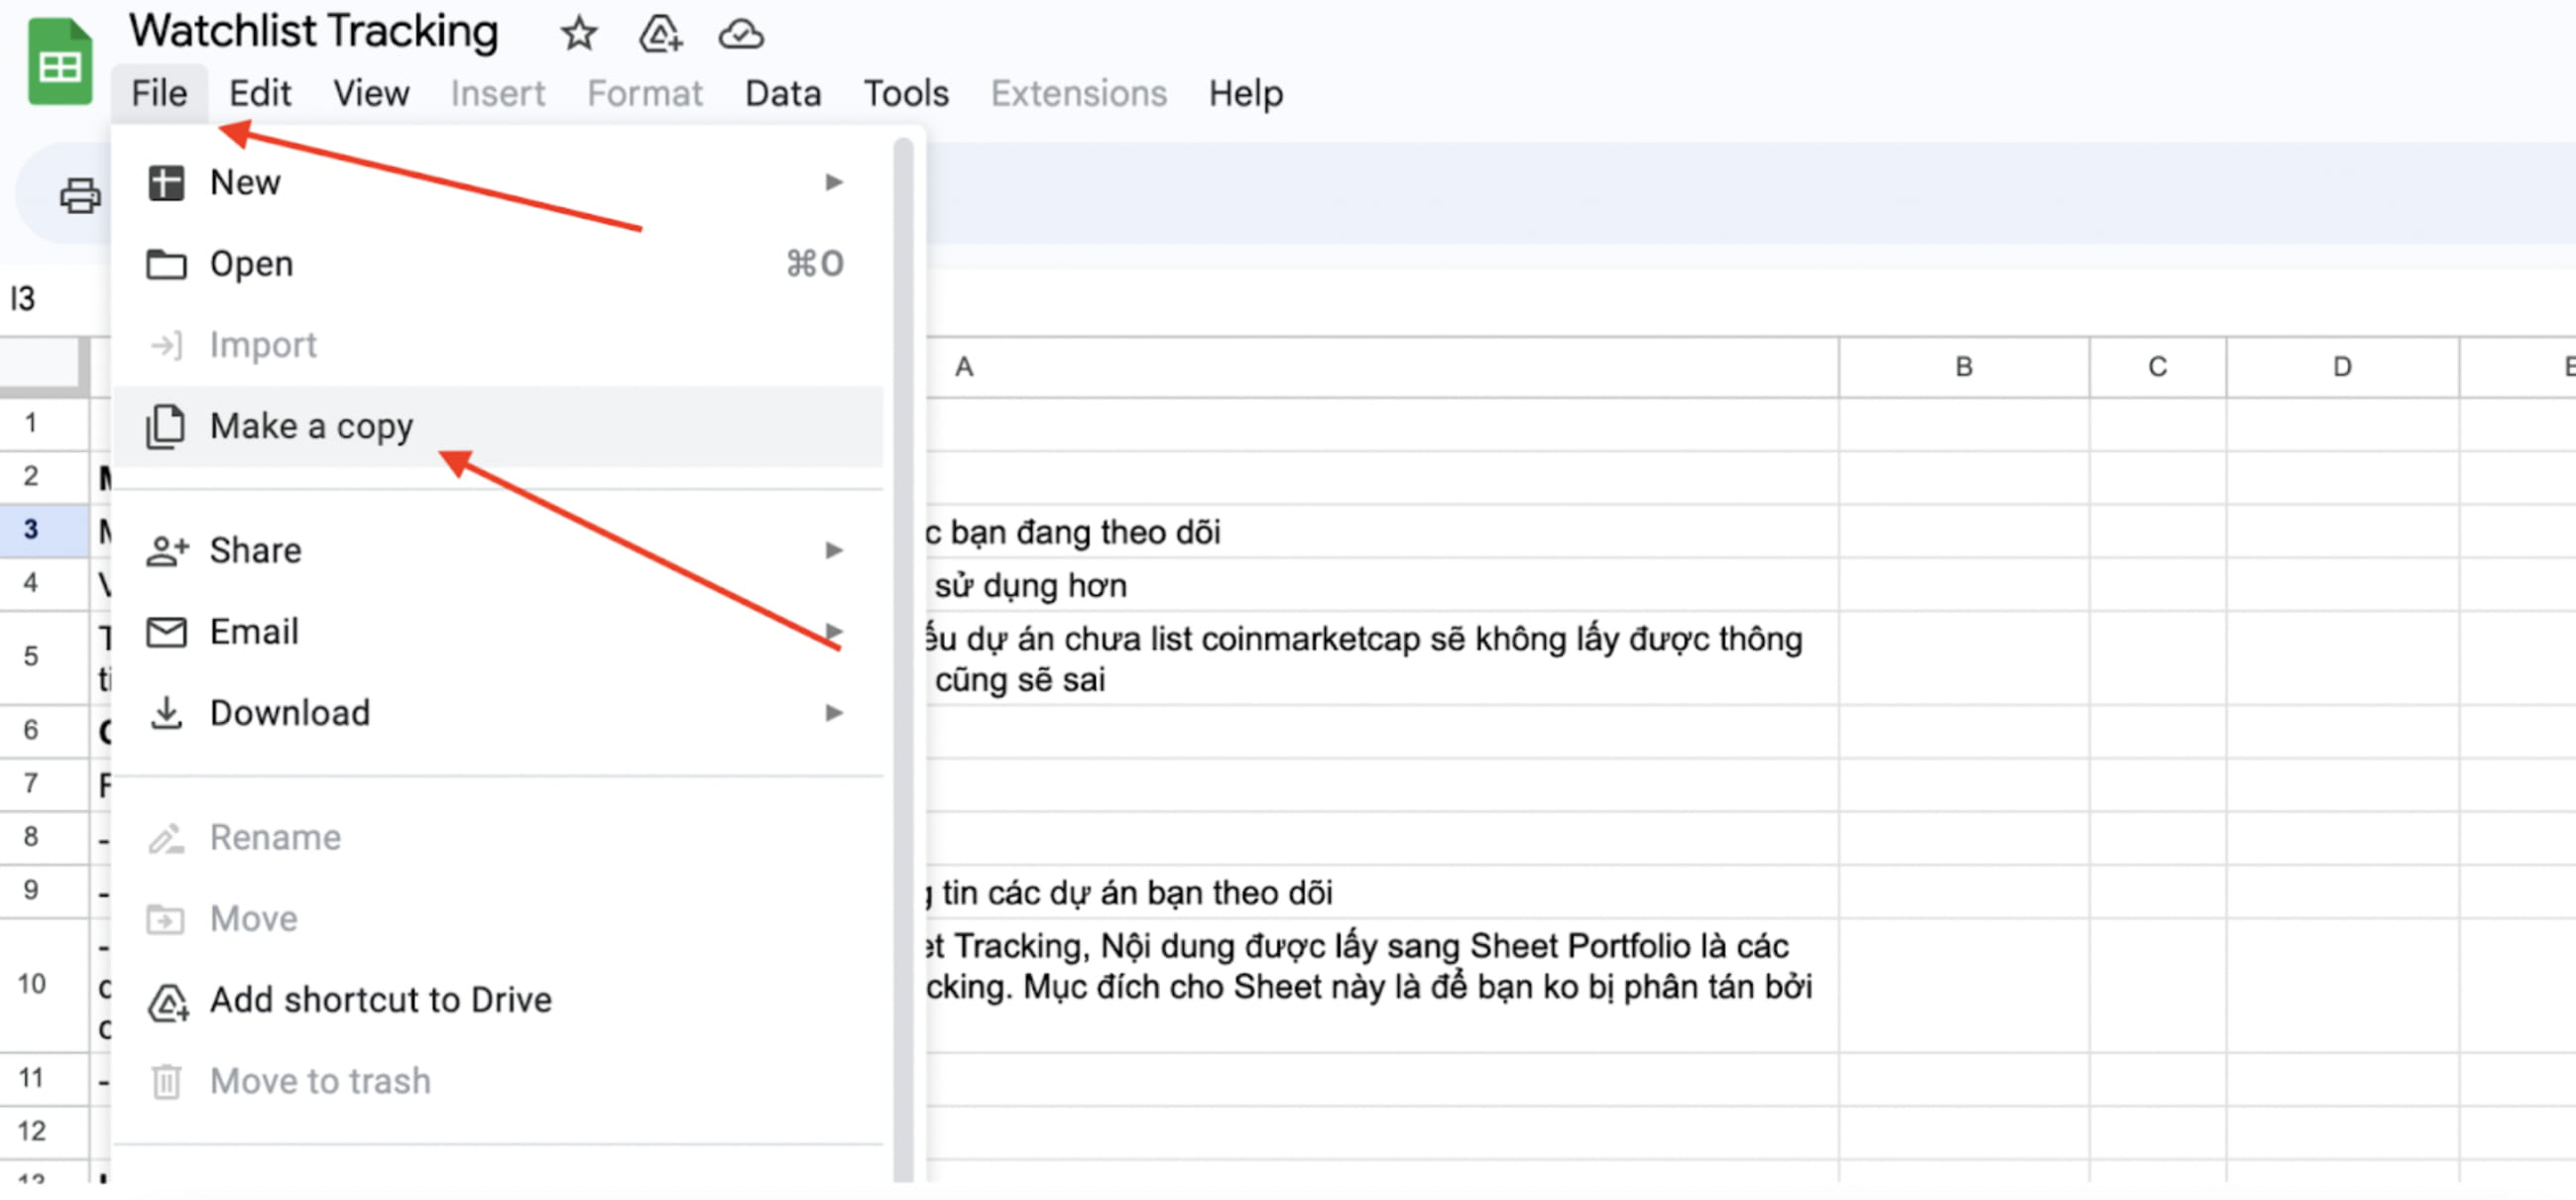
On the Google Sheet toolbar, click File > Make a copy
A Popup appears for you to choose where to save the file on your Google Drive, you can also rename the file to make it stylish :D.
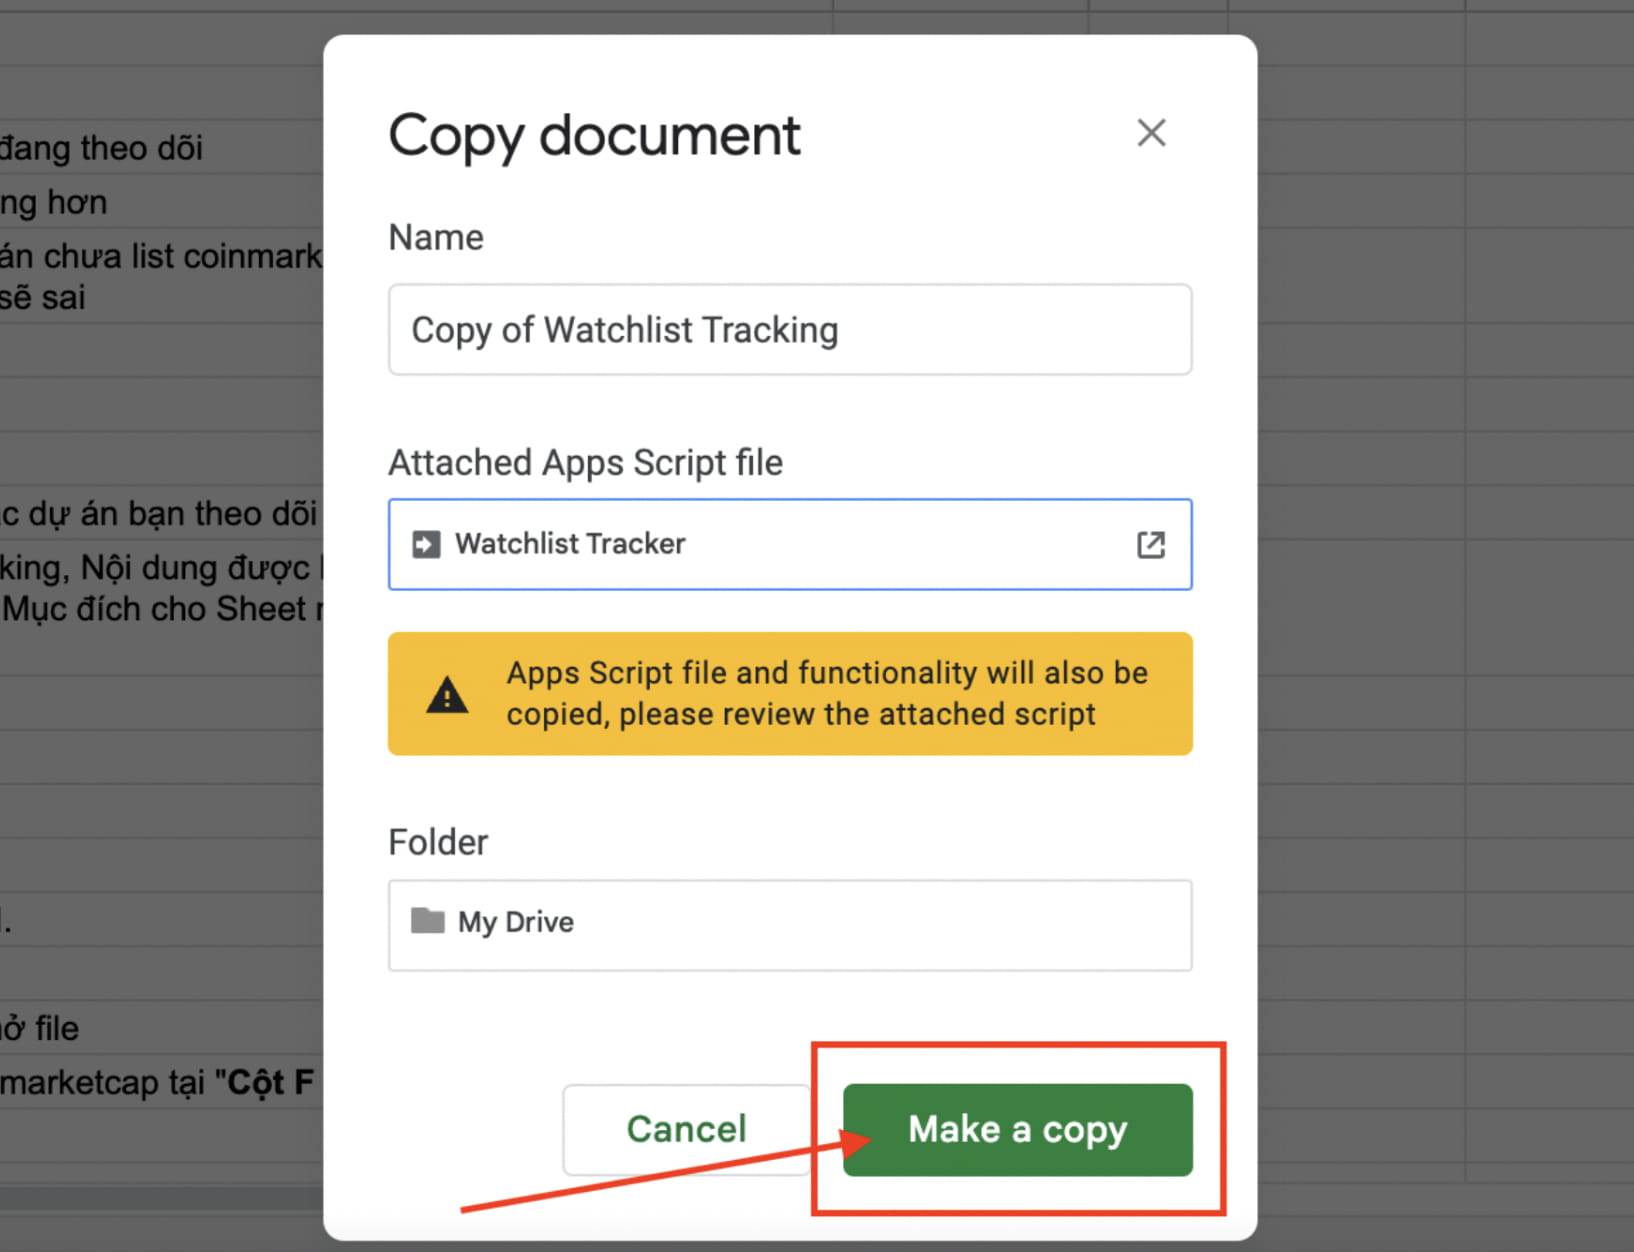
In the popup notification also appears: Clone file will also Clone the file's executable scripts, you don't need to worry, because all the source code you write inside is OPEN SOURCE, anyone can see and know. What operations does the file perform, there is no collection of any information. You can check the script source code by selecting Extension > Script after cloning the file.
After Clone the file, remember to bookmark it for easy access next time.
STEP 3: CREATE TRIGGER TO AUTOMATICALLY UPDATE DATA
The script that updates data from Coinmarketcap and Defillama will not run unless you press the run button in the Script driver. But Google has a tool to help you execute it automatically every time you open the file or press F5. Those are Triggers from Google itself.
To do this, do the following:
At the Sheet file interface that you cloned (your file)
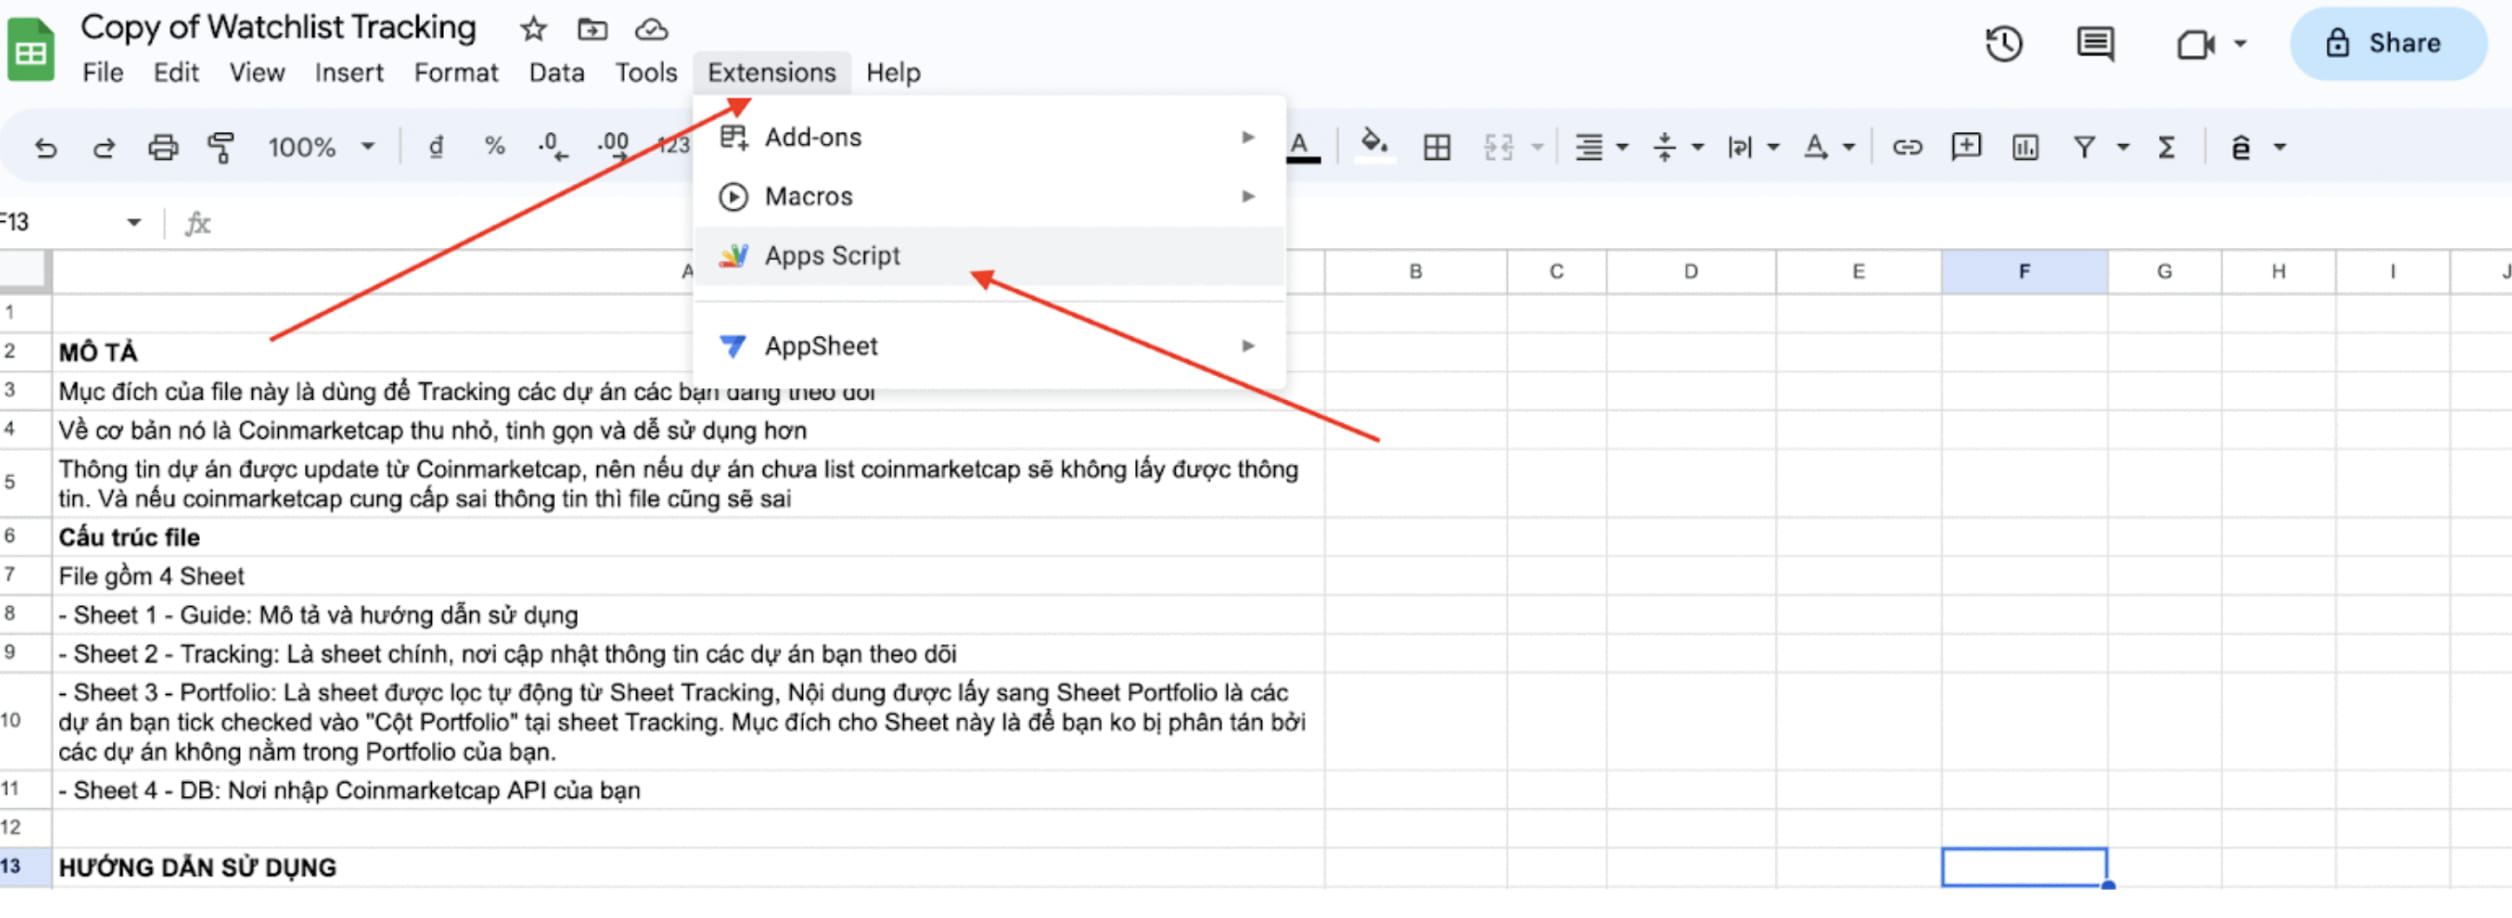
On the Menu toolbar, click Extension > Select Apps Script
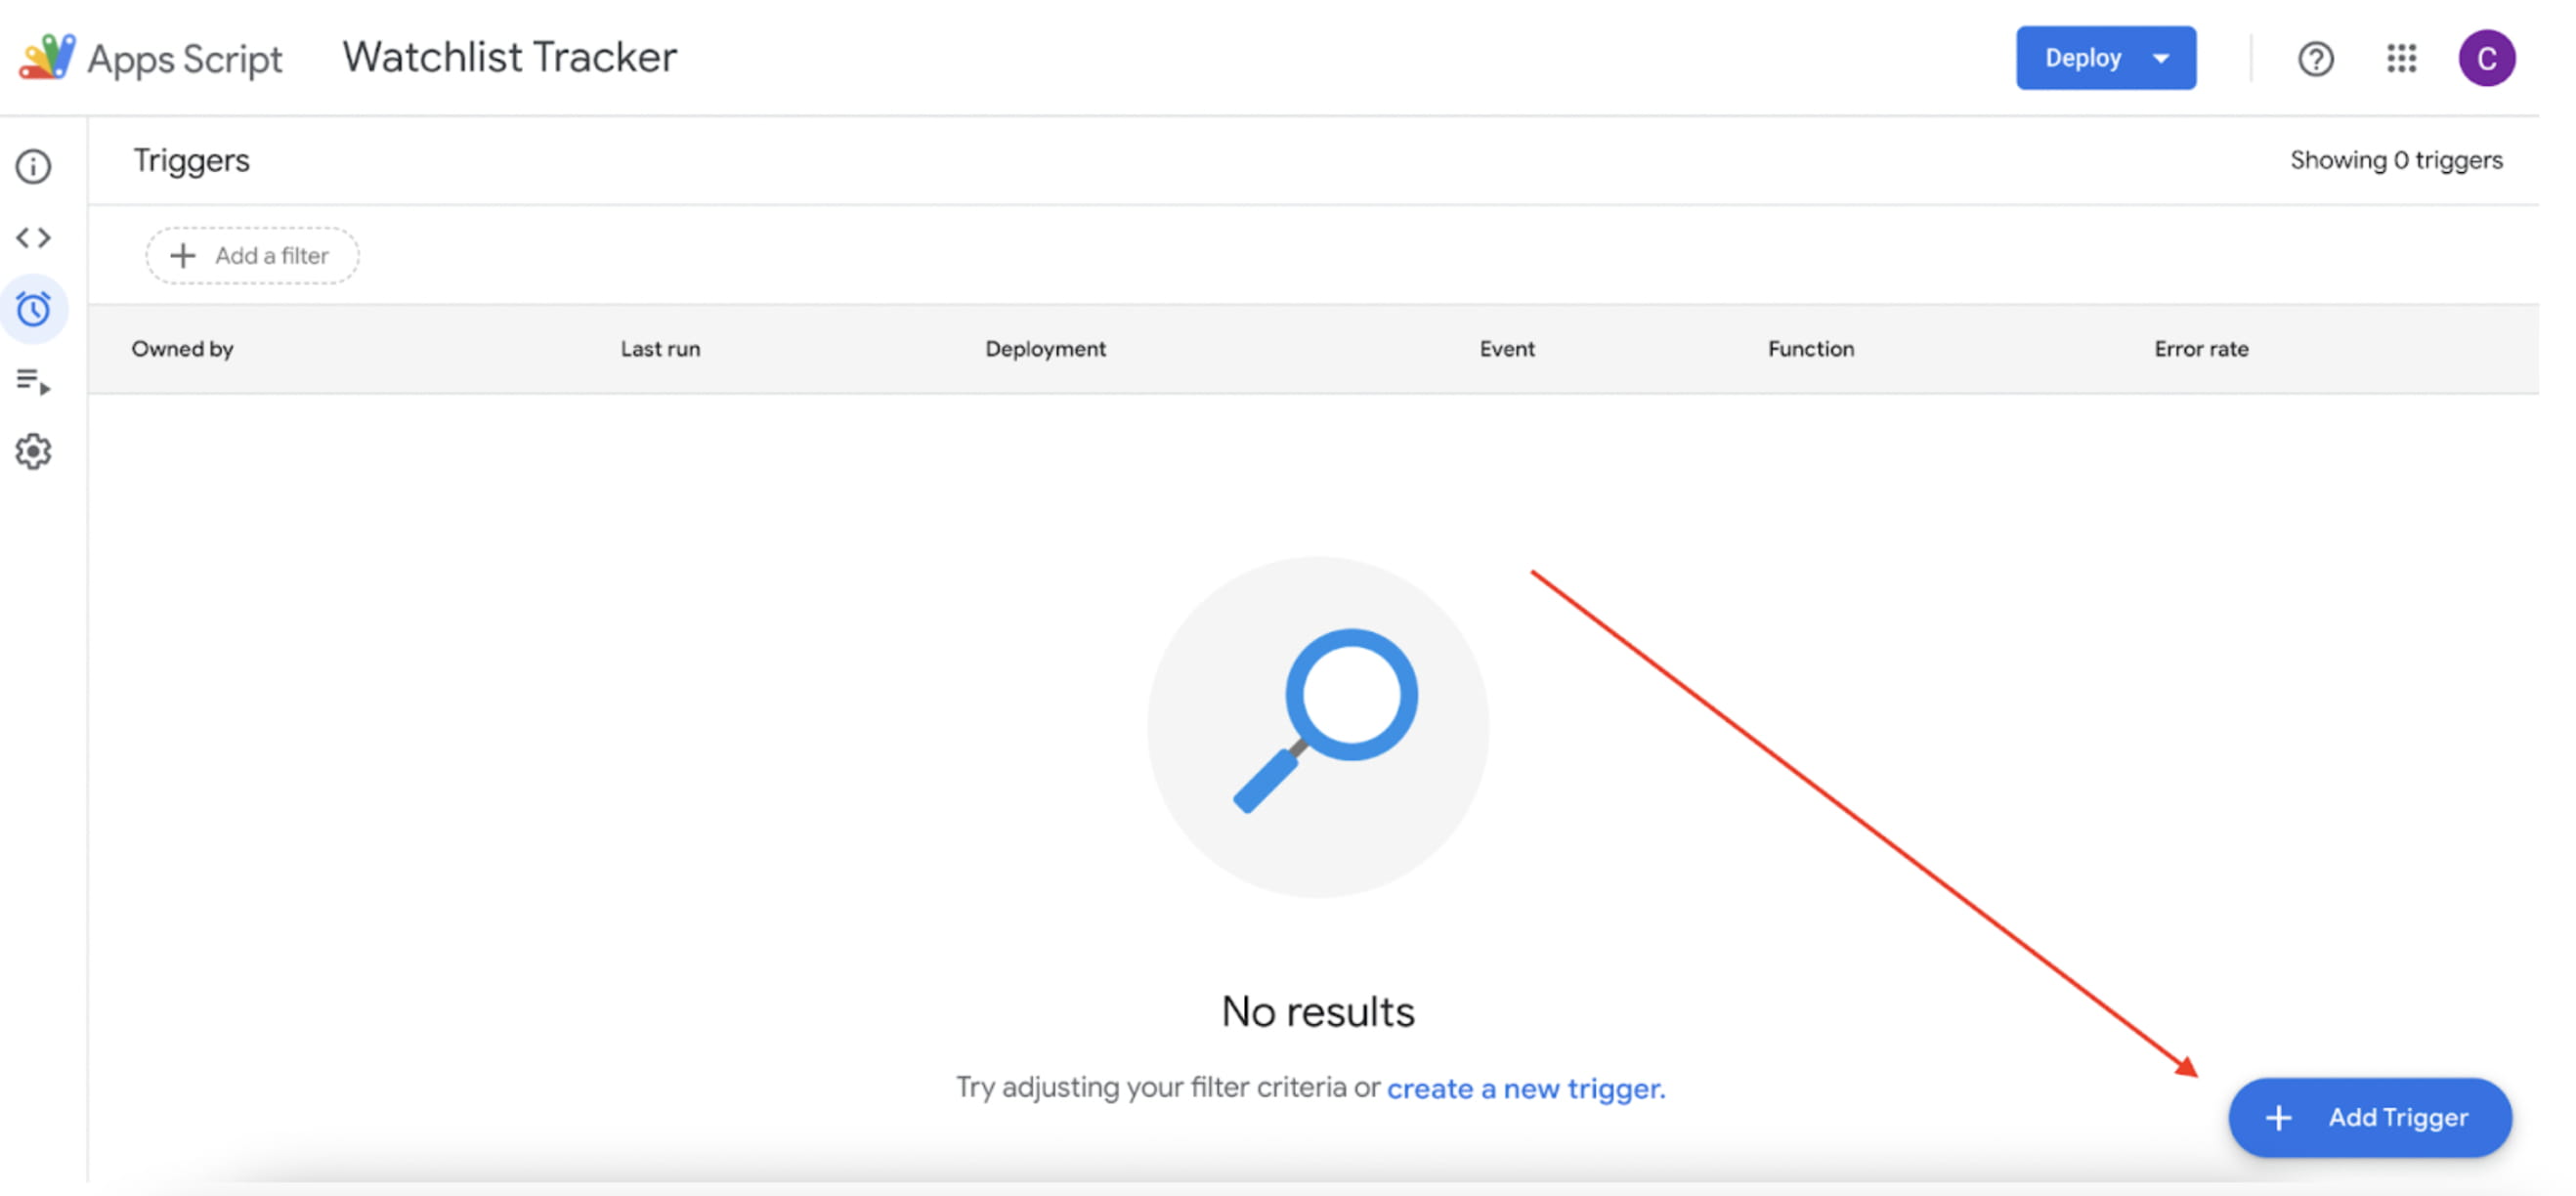
In the Apps Script interface, notice the Menu along the left and you will see a clock image. Move the mouse to and click on it - Triggers

At the Triggers interface, look at the bottom right corner and you will see the button: Add Trigger, click on it.
The setup Trigger popup appears, please setup as shown below.
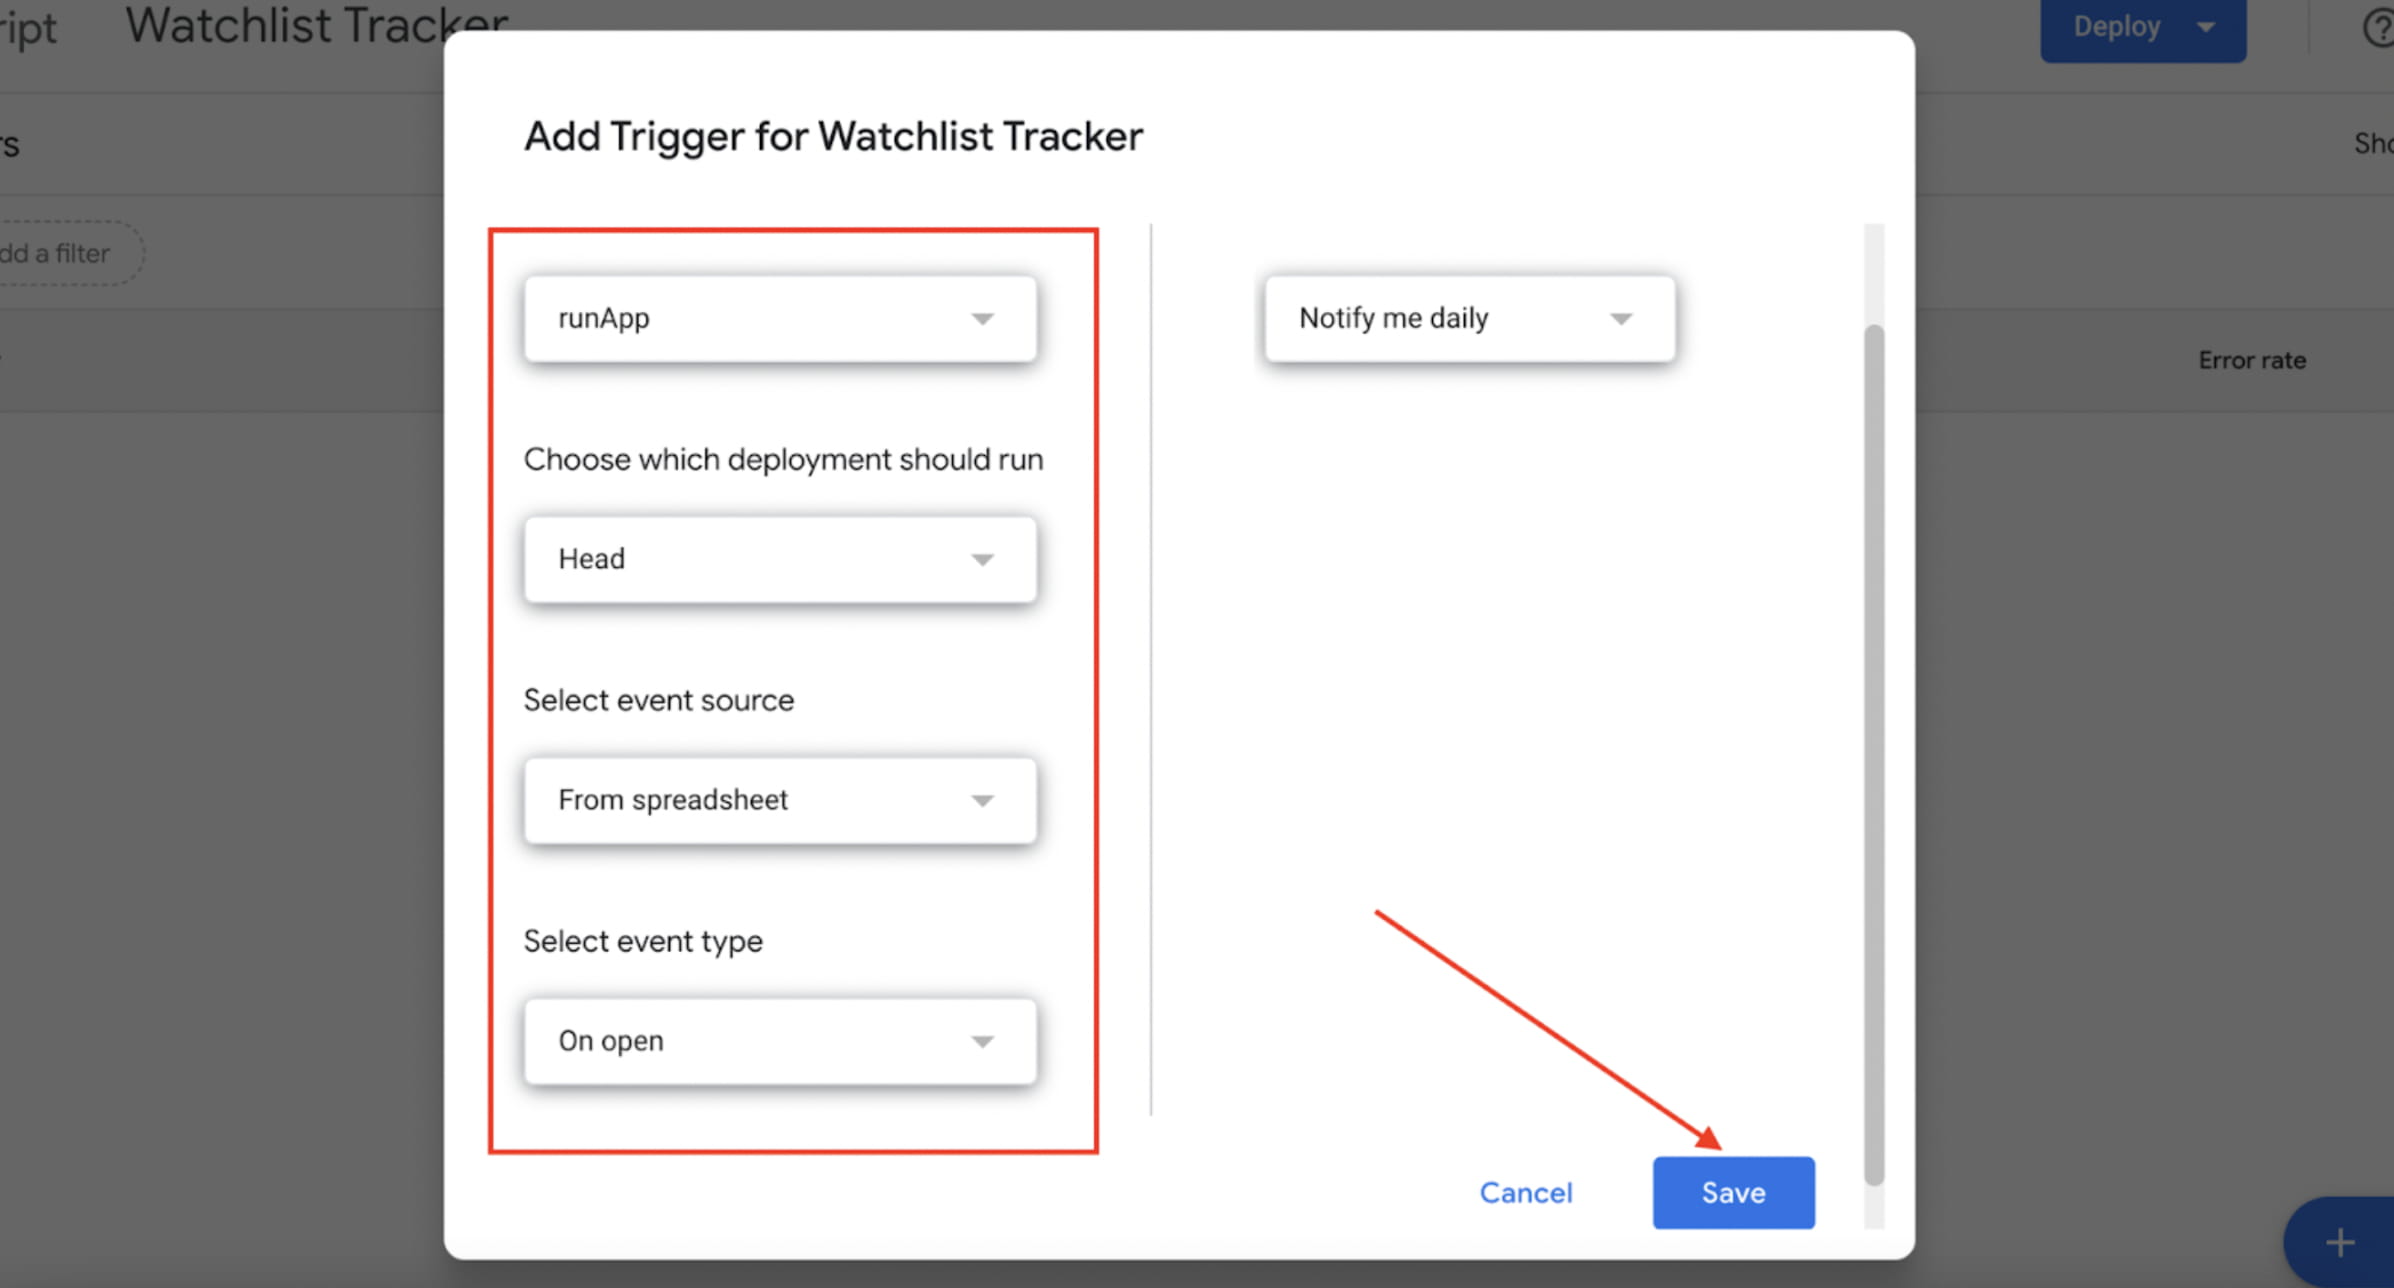
Click Save, wait a moment.
Another Popup will appear for you to give permission for the Script to run. If you don't see it, press Save again, or check to see if the Popup is blocked by Google Chrome.
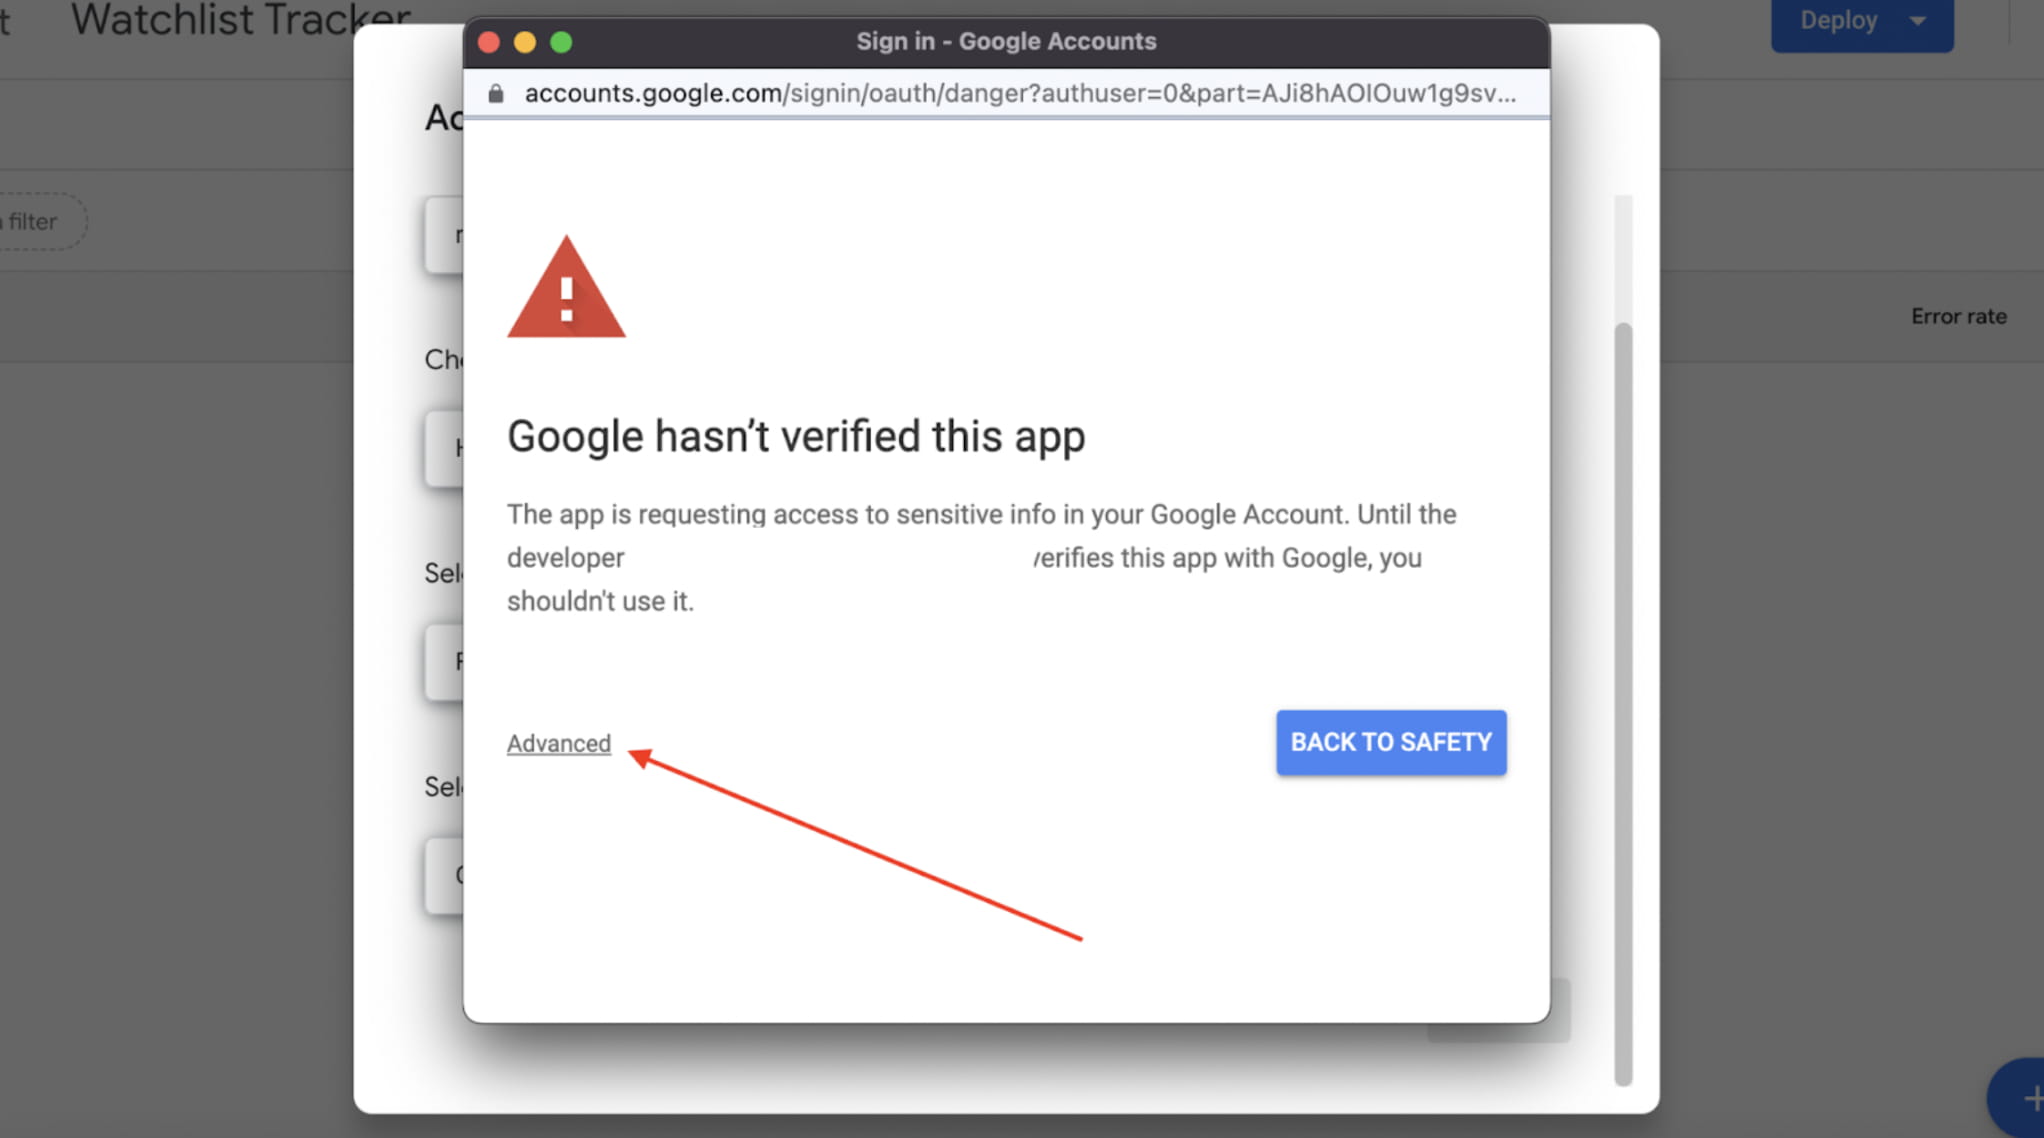
At the Permission Popup, press Advanced
Then click Go to Watchlist Manager (unsafe)
In the next window, scroll down to the bottom and select Allow
Trigger setup completed, from now on every time you open the file or press F5, the data will be reloaded from Coinmarketcap and Defillama.
Note: If you do not understand programming, you should not edit miscellaneous code, just set up according to the instructions, but if you know the code, you can customize the App to suit your needs.
STEP 4: ADD SLUG TOKENS AND START USING
Important: First you need to know what "slug" is?
“Slug" is the end of the link to Coinmarketcap's token information page. Actually, it is possible to get data through the token code, but on coinmarketcap there are many projects with duplicate token codes, which can lead to downloaded information. So the most optimal way is to get the slug - the link to coinmarketcap's token page.
Look at the picture below, you will understand what "token slug" is.
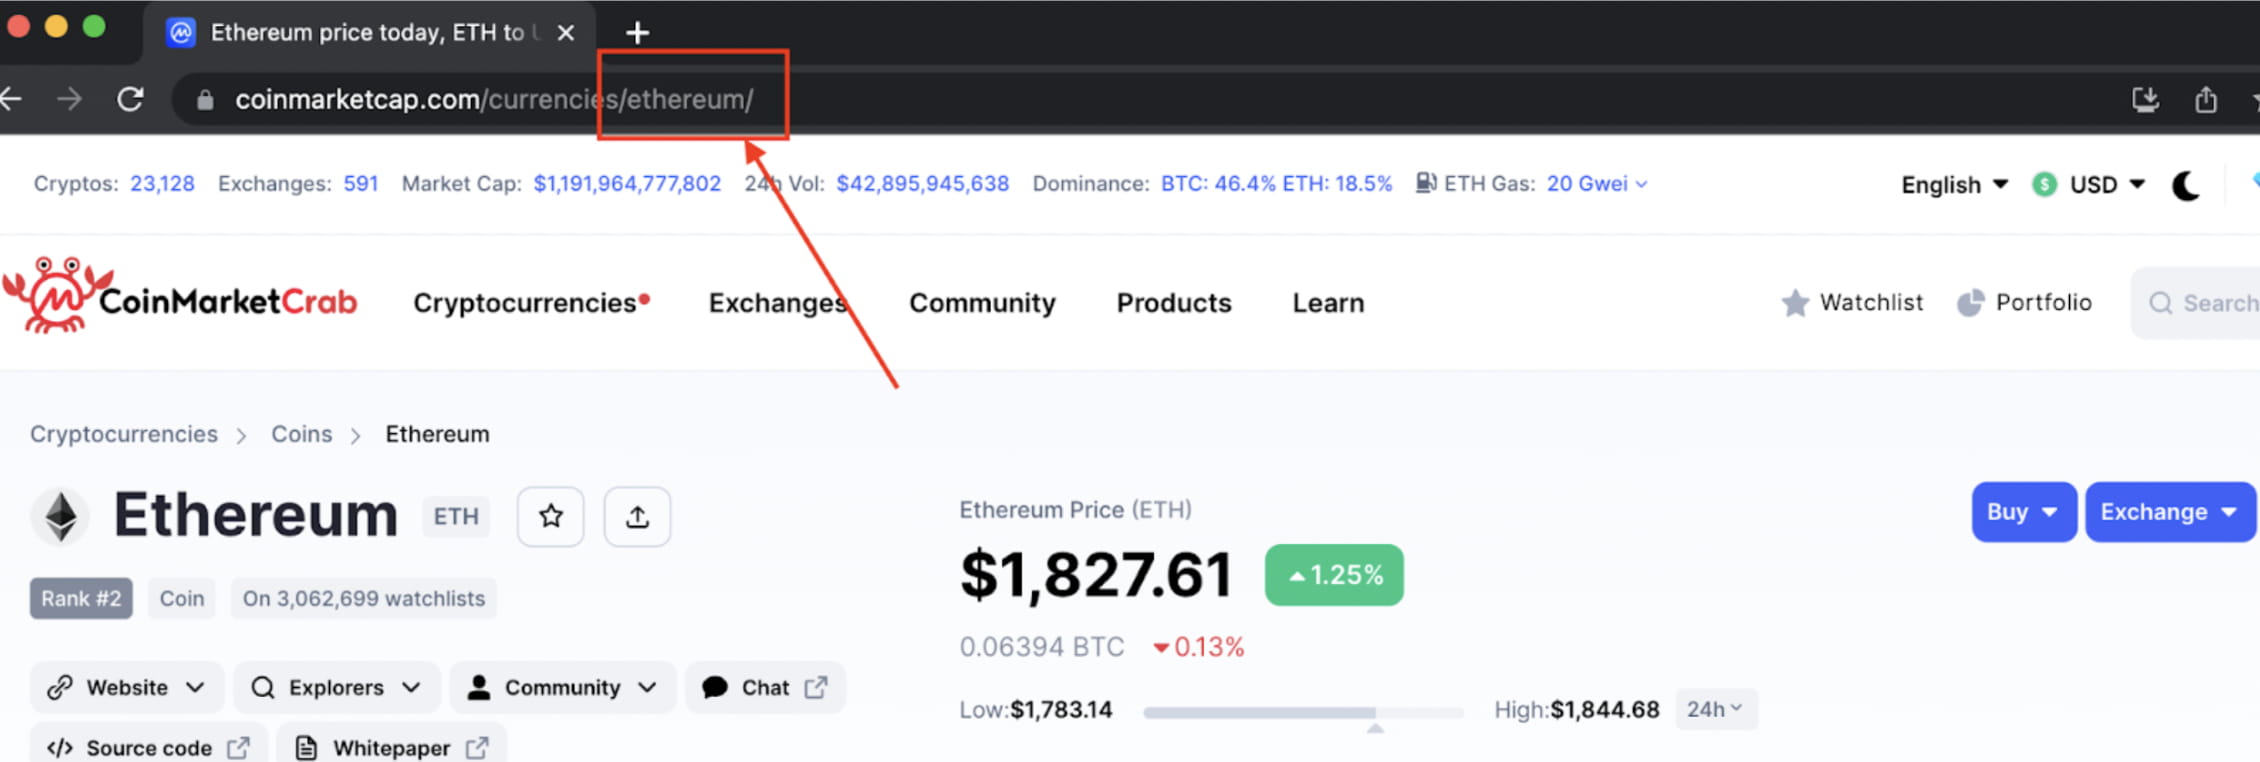
The project's slug in the picture is the word at the end between the two signs / .... / = ethereum
When you need to put Ethereum in your watchlist, copy the word "ethereum" and paste it into the Slug column in your file (remember to remove the slash, just use the word ethereum).
AFTER YOU HAVE CLEARED THE SLUG, YOU NEED TO KNOW THE STRUCTURE OF THE FILE AND AREAS THAT CAN BE FIXED AND AREAS THAT CANNOT BE REPAIRED.
File gồm 4 Sheet
Sheet 1 - Guide: Introduction. After reading, you can hide or delete it.
Sheet 2 - Tracking: The main working area here, there are some data areas that update automatically, and some areas that update manually. Do not rename this Sheet.
Sheet 3 - Portfolio: Data is filled in completely automatically, this Sheet just needs to be viewed. Do not rename this Sheet.
Sheet 4 - DB: Where to fill in your COINMARKETCAP API, you can just fill it in once and then hide it, but you can't delete it or change its name.
First, go to Sheet 4 - DB first. Copy the Coinmarketcap API obtained in step 1, paste it into Cell A2 (right below the box titled COINMARKETCAP_API). Note, paste this box correctly.
Finished API update!
Now focus on Sheet 2 - Tracking.
First, I will explain the 3 ABC columns, used to divide categories.
When you enter an asterisk “ * ” into any cell in columns A or B or C, the entire line will light up in different colors.
Column A is orange-yellow - representing a large title.
Column B is dark gray - representing the Crypto category of your choice.
Column C is light yellow - showing that the project you need to highlight is more focused.
This part is set up using the available "Conditional Format" of Google Sheet. If you are proficient, you can edit the colors as desired.
If you want to add a category, just enter its name in column D and add a " * " sign in column B on the same line to color it.
Note, once you have entered it as a category in column D, you cannot enter other information, the category is only on one line. Projects in the category will be imported from the line below.
The second very important column you need to pay attention to is column F - Slug.
This is where you enter the Slugs of the project you want to track.
Just paste the slug of the project you need to track into this column. It's okay to have duplicates in many categories, but you definitely can't make mistakes. If one slug is wrong, the entire code won't run. This is the most common error. If you see an error message in Cell A1, the first thing to think about is to check to see if column F has any incorrect slugs.
Once the Slug has been filled in correctly in column F, after F5, columns D, E and from H to AE will be automatically updated, you do not need to fill in any data in these columns.
Next is column G - Portfolio
Column G is a checkbox.
This column means which projects are in your investment portfolio, so click checked to make it easier to follow. The second purpose is for the script to identify and update a separate 3rd Sheet - Portfolio.
Sheet Portfolio is a 100% automatically updated sheet, you do not need to customize anything. This sheet will retrieve all the projects you ticked in column G - Portfolio of Sheet 2 - Tracking. The purpose is to categorize you to focus on the projects you have invested in.
Still in Sheet 2 - Tracking. The areas from behind the AE column onwards (after the gray line) are hand-entered data, you can freely modify the structure and enter notes whatever you want without fear of overwriting the data each time. update.
Some API websites do not support it, so they do not have a built-in link to go to the information page with one click, such as Messari, Dune, Chainbroker, so I converted it into a Google Search link to their site.
Cell A1 of the Sheet is where the file's update status is displayed. If Updated 🟢 is displayed, the data has been updated successfully. If there is an error, it will report Error 🔴 with the error content. The error is usually due to entering the wrong slug in column F.
In addition, you can feel free to tinker, fix, destroy this and that. When the error doesn't work, go back to the file you shared and clone it and start over.
I remind you once again that this entire Google Sheet file and the script code inside are OPEN SOURCE, anyone can see what operations the file performs, so I will not take any responsibility for it. your data.
Finish setup!
If you find it useful, please give me a heart and retweet!
» https://twitter.com/KudoDefi/status/1642878899049865216
Thank you ❤️

