
Brief summary
If you're interested in the Ethereum ecosystem, you need an app like MetaMask. Going far beyond being a simple wallet, MetaMask allows you to interact with websites integrated with Ethereum.
MetaMask allows you to connect to decentralized applications from within your browser (or via a mobile app). You can trade without intermediaries or play games with a completely transparent code (so you can be sure there is no cheating).
You can use our guide below to start using MetaMask!
Contents
Entrance
What is MetaMask?
MetaMask installation
Start wallet
Back up your recovery words!
Deposit money to wallet
Getting started with the decentralized web
MetaMask and privacy
Exchange ether for DAI
Where are my tokens?
What else do I need to know?
MetaMask mobile app
final thoughts
Entrance
This infrastructure is developing with firm steps, thanks to Decentralized Finance (DeFi), which is at the center of attention of the entire sector, and interoperable protocols that aim to bridge different blockchains. It is now possible to exchange tokens and cryptocurrencies in a trustless way, get crypto-backed loans, and even use Bitcoin on Ethereum.
MetaMask is the first wallet of choice for many people interested in Ethereum. MetaMask is available as a browser extension that allows users to interact directly with supported web pages, unlike your standard smartphone or desktop software. In this article, we will talk about how MetaMask works and provide you with a detailed guide so you can start using this wallet.
What is MetaMask?
MetaMask is an open source Ethereum wallet that supports all types of Ethereum-based tokens (e.g. those using the ERC-20 standard or unique tokens). Additionally, you can buy tokens from others or buy/swap tokens with built-in Coinbase and ShapeShift integrations.
What makes MetaMask so interesting is its ability to interface with websites. For other wallets, you'll need to copy and paste payment addresses or scan a QR code on a different device. With the MetaMask extension, the website pings your wallet and you are given the option to accept or reject the transaction.
MetaMask can serve as a standard crypto wallet, but its real power lies in its ability to seamlessly interface with smart contracts and decentralized applications. Now let's look at how you can install MetaMask.
MetaMask installation
MetaMask wallet can be installed in Google Chrome, Firefox and Brave browser. It is also available on iOS and Android, but we will not talk about these applications in detail here. In this guide, you will be using Firefox, but the steps you need to follow will be almost the same regardless of the platform you use.
Go to the download page on Metamask.io. When you select your browser, you will be directed to the Chrome web store or the Firefox add-ons site. Click the button to add the extension to your platform. You may need to grant some permissions for the app to start working. Make sure MetaMask's level of access to your browser is appropriate for you – if you're happy with it, we're ready to get started.
Start wallet
At this stage you should see a welcome message.

If you're anything like us, you'll probably spend a lot of time trying to turn this fox's head with your cursor.
When you get tired of dealing with the fox on the welcome page, click the Get Started button. At this point you will be asked to import a seed phrase or create a new wallet. Click the Create a Wallet button. The next page will ask if you want to share anonymous data to help developers improve the app. Choose the option you want.
Now you need to create a strong password. If you are one of those legendary beings who actually read user agreements, you can view the agreement by clicking the Terms of Use button. Otherwise, create a strong password, check the box and press the Create button.
Back up your recovery words!
This stage is important enough to have its own subheading. MetaMask is a non-custodial service, meaning no one but you can access your funds – not even MetaMask developers. Your tokens reside inside your browser, a sort of encrypted vault protected by your password. This means that if your computer is lost, stolen or broken, no one will be able to help you recover your wallet. Your private keys are lost forever in the depths of the cyber world.

Click on the gray box to view the sentence.
When you get to the next page, the program asks you to confirm the sentence in case you skipped the previous step. If you didn't do it the first time, go back and write your words!
Confirm the words and continue to the next step. Press the All Done button and you will see the wallet interface.
The boring part is over, now it's time to get rich with (testnet) ether.
Deposit money to wallet
In this guide, we will use the Ropsten testnet. Ropsten is a network that works almost exactly the same as the real Ethereum network, but its units do not carry any value. This network can be very useful if you are developing contracts and want to make sure there are no software vulnerabilities that could allow attackers to siphon off $50 million worth. Every step we take today on this network can be replicated exactly on the real network (unfortunately, except for the part where they give us free ether).
To go to the Ropsten test network, click Main Ethereum Network in the upper right corner and select Ropsten Test Network.
Ethereum has many different test networks. If you are curious about the differences between these networks, you can take a look at this comparison.
We will use a tap to get the fake coins we will use. You can access fake coins by going to this page from your browser where you have Metamask enabled.

Hooray! Free money!
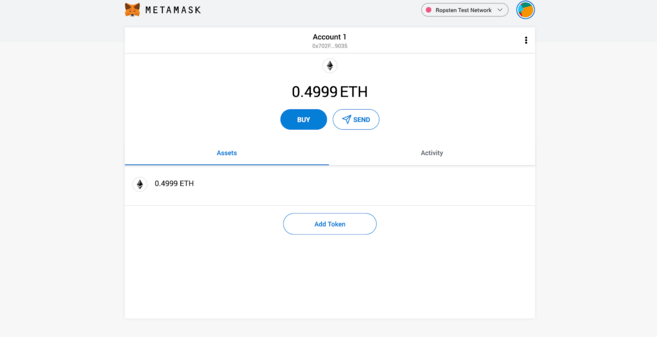
You can always click on the little fox icon to see your MetaMask account information in a pop-up window (like we did in the GIF above). Hover your cursor over Account 1 and click to copy your Ethereum address to the clipboard. Paste this address into the form and press the Send me test Ether button.
Ethereum transactions are usually confirmed fairly quickly, but it may take a while for 1 ETH to arrive in your wallet. Check if you have received ETH by clicking on the fox icon in your toolbar.
Once the funds reach you, we can start interacting with the DApps.
Getting started with the decentralized web
Since we are on the test network, the number of applications we can use is not very many. For a comprehensive list of mainnet decentralized applications, you can visit State of the Dapps or Dappradar. You can play games, buy one-of-a-kind assets, or bet on prediction markets.
We will use a DApp that we mentioned before. Uniswap is a decentralized exchange (DEX), meaning it allows trading without intermediaries. The underlying mechanisms of Uniswap are quite successful – if you want to learn about how the platform works, read What is Uniswap and How Does It Work? You can read our article.
Access Uniswap by clicking here. In the upper right corner you will see the Connect to a wallet option. You can see this in some form on all MetaMask compatible sites because MetaMask does not automatically connect for security reasons. When you click on this option, you will be asked to select the wallet you are using. For this example, our wallet will be MetaMask.
The first time a site tries to connect, a MetaMask window opens asking you to confirm. You can select an account before verifying which permissions to grant (we only have one account, so you don't need to make any changes). As in many other examples, here too the site requests information about the wallet address that your account controls.
About MetaMask and privacy
It's important to be careful about what you allow. If a website knows your address, it can see all ether and token transactions entering and leaving that address. Moreover, it can also link this information to your IP address.
While some choose to separate their addresses to prevent any interception, others do not take these risks too seriously (the blockchain is public, after all). Ultimately, the level of privacy you want to have is up to you. As a general rule, you should not grant access to websites you do not trust.
Swap DAI for Ether
It's time to make our first trade. We will do this with DAI, an ERC-20 token that serves as a stablecoin. But like our ether, this DAI has no value in the real world. Click Select a token, add the Uniswap Default List, and then click DAI. Instead, you can also choose WETH (wrapped ether).
Now all we have to do is choose the amount of ETH we want to exchange. In doing so, we will be provided with an estimate of how much DAI we will receive. And now we are ready! Click Swap.
Completing the exchange with MetaMask
You will once again be directed to trade on MetaMask. In this case, you will be asked to confirm this transaction before it is created. When trading on the mainnet, make sure the transaction fees are affordable to you as these fees can be quite high.
After that, all we have to do is wait for the transaction to be confirmed!
➟ Do you want to enter the world of cryptocurrency? Buy ETH on Binance!
Where are my tokens?
Your ethers are gone, but your tokens do not appear in your account. No need to panic – you need to add these tokens manually.
For more popular tokens, you can select Add Token from your wallet and search for the token's name or shortcode. But for less popular ones (or those on the testnet) you need to add the contract address – a token that tells MetaMask where to look for our balance.
Open your wallet by clicking on the extension.
Press the three dots on the top menu.
Select View on Etherscan.
Under the Overview tab, click the Token drop-down menu and select DAI.
You should see a contract address under the Profile Summary tab. Hover your cursor over it and copy the address.
Go back to MetaMask and click Add Token.
Click the Custom Token tab.
Paste the address you just copied into the Token Contract Address form.
The remaining sections will be filled automatically. Click Next and then Add Tokens.
Go back to the main summary to see your full balance.
Congratulations! You made your first DApp interaction by trading ether for DAI in a trustless manner. Everything you learn here, you can now do in the real world. Don't forget to switch back to the mainnet from Ropsten when you're ready to use the mainnet applications.
What else do I need to know?
MetaMask also has other nice features that we haven't talked about today. You can connect a hardware wallet (both Trezor and Ledger are supported), create a contact list, and of course receive and send funds just like a regular wallet. You can also change the settings to personalize the extension to suit your needs.
Apart from this, standard security principles apply: MetaMask is a hot wallet, meaning it runs on an internet-connected device. This exposes you to more risk than a cold wallet that is kept offline to reduce attack vectors.
Finally, it is important to be careful about which websites you allow access to when using MetaMask.
MetaMask mobile app
The MetaMask Android/iPhone app provides a successful solution for interacting with Web3 applications on the go. The mobile app, which has most of the functionality in the extension, is integrated with a DApp browser that allows you to access different decentralized applications with the touch of a button.

The browser of the MetaMask application.
The way the app works is very similar to a browser extension. You can make direct transfers with your ethers or tokens in your wallet, and even interact with Uniswap as we mentioned above.

You can connect to PoolTogether through a prompt in the app.
final thoughts
MetaMask is a powerful tool for viewing the decentralized web. If you followed the steps in this guide, you must have seen the potential of the wallet. It's clear that others see this potential too, because MetaMask currently has over a million users.
There is no doubt that as the Ethereum world evolves, applications like MetaMask will become important elements that connect existing technologies and emerging cryptocurrency infrastructure.
Have questions about MetaMask, Ethereum or other topics? You can visit Ask the Academy, where your questions will be answered by the community.