The original title was "Understand and run Xai nodes to earn XAI tokens", but due to the development and changes in the node ecology, it has now been renamed "Understand the Xai staking ecology to earn XAI tokens".
Please note that this article will be continually updated to ensure the latest information and guidance is provided. At the same time, please understand that the screenshots in the article may differ slightly from the latest version, but this will not usually affect the understanding of important content.
Description of the two stages
The XAI node ecosystem is divided into two main stages:
Phase 1: December 7, 2023 to April 17, 2024
The details of this phase are documented and described in "Part I" below. It mainly introduces how node supporters can run XAI nodes during this period. Although the scheme of Phase I still applies in Phase II, that is, nodes can continue to operate in the same way to earn rewards, it is not economical to do so. Community members will basically quickly switch to the new operation method because of the better mechanism of Phase II.Phase 2: April 17, 2024 - Present
The details of this phase will be introduced in the “Second Part” below. It mainly focuses on the introduction of the staking system v2, which brings a new change in the concept of staking pools (v1 is a transitional period, so it is ignored here).
Since the contents of the first phase will gradually fade out, this article puts the "Second Part" in front and puts the "First Part" as an appendix. If you are interested in the historical background of the first part, please continue to scroll down to view it.
At 12:00 noon on December 7, 2023, the rush to buy XAI node authorization (in the form of NFT) attracted widespread attention. If you plan to purchase node authorization, please purchase it through the official channel of XAI node.
Official KEY purchase channels:
https://sentry.xai.games/
Please make your own decision on whether to purchase based on a full understanding of the project. In addition, users who purchased KEY in the first quarter have received XAI airdrops, with 1,500 XAI airdropped for each KEY. Users who purchased KEY in the second quarter will also receive airdrops, but the specific amount of airdrops and snapshot time have not yet been determined. (This paragraph was updated on April 22, 2024)
🚀Part 2🚀
For a detailed analysis of the XAI staking ecosystem, please refer to the article (Understanding the XAI staking mechanism and ecosystem development). Here, I will briefly introduce the relevant content and focus on analyzing how to stake.
🔥Disclaimer🔥: The content of this article is based on my personal research and understanding, and may be biased. I warmly welcome everyone's discussion and suggestions, let us learn and make progress together!
Who can participate in the staking ecosystem?
The current participants in the staking ecosystem are divided into two categories: first, users who purchase node KEYs must complete KYC certification to participate; second, users who hold esXAI. esXAI is a special token that users can obtain by purchasing XAI and then converting it into esXAI.
Official website of pledge ecology:
https://app.xai.games/
The core concept of staking pool
⭐⭐⭐Note that on December 14, 2024, XAI's KEY was split, 1 to 100, so the data below needs to be scaled up proportionally. I'm lazy and will not update the case data in this article.
💥What problem does the pool solve?
In short, the staking pool can be regarded as a small community in a large community, or similar to a guild in an online game. This metaphor helps to understand the importance of the staking pool. The staking pool not only promotes cooperation among community members, but also solves some other problems. For more details, please refer to the article (Understanding XAI Staking Mechanism and Ecological Development).
💥How to create a pool?
Users who have purchased node KEY and completed KYC certification are eligible to create a staking pool. When creating a staking pool, at least one KEY must be deposited.
The pool creator needs to set three parameters to determine the distribution ratio of esXAI output: the ratio of the creator (team), the reward ratio of users who deposit KEY, and the reward ratio of users who stake esXAI.
💥What is the relationship between pool, KEY, and esXAI?
The amount of esXAI produced by the staking pool directly depends on the number of keys deposited in it. In other words, when a user deposits a key into the staking pool, the output corresponding to the key will be contributed to the pool. Therefore, the more keys there are in the pool, the more esXAI it produces.
In the first stage of the staking ecosystem, users need to run nodes themselves to obtain esXAI rewards after purchasing KEY. The specific process is detailed in the second part of the appendix. In this stage, a KEY can receive an average of 7 esXAI rewards within 30 days. However, by depositing KEY into the staking pool, users can avoid the need to run nodes by themselves, but users can still continue to run their own nodes, which is equivalent to backing up the pool nodes. In fact, this is equivalent to the user entrusting the operation of the KEY to the staking pool, and the creator of the pool is responsible for the operation and maintenance of the node. In this way, users only need to deposit KEY into the pool to enjoy the esXAI rewards brought by the pool operation without directly participating in the operation of the node.
As the number of esXAI pledged into the pool increases, the level of the pool will increase accordingly. In particular, when the total amount of esXAI pledged in a pool reaches a certain amount, currently 5.5 million, the pool will be promoted to the highest level - diamond level. Pools that reach Diamond level will enjoy a 6x bonus on output, which is called a 6X pool in the community. Specifically, if a KEY receives an average of 7 esXAI rewards within 30 days under normal conditions, after being deposited into the 6X pool, the number of rewards within the same period will increase to 42 times. This means that joining a diamond-level pool can significantly increase the output of the pool esXAI, thereby increasing the reward income for KEY staking users and esXAI staking users.
💥Pool level analysis of the current version
Current version (Xai updated the staking rules on June 8):
The community is still exploring after the launch of the V2 staking pool. According to the above picture, some fixed information is:
After 1 KEY is deposited into the pool, the number of esXAI that the pool can accommodate increases by 20,000.
A pool can hold a maximum of 1,000 keys, so the maximum number of esXAIs a pool can hold is 20 million.
The highest level diamond pool requires a deposit of 8 million esXAI, and it is difficult to achieve a 7x acceleration in the short term.
Most pools will be in the silver pool, which is 1.5 times faster.
💥Example
Assume there is a 3X pool with 750 KEYs, and the total amount of staked esXAI reaches 1 million. The pool ratio is as follows:
Pool owner - 5%
KEY acquisition ratio - 80%
esXAI acquisition ratio -15%
The daily output of this pool is calculated as follows:
On average, each KEY can be asserted 7 times in 30 days.
The pool is a 3X pool, so each KEY is asserted 7*3 = 21 times in 30 days.
There are 750KEYs in the pool, so each pool has 7*3*750=15750 assertions in 30 days.
The current reward for each assertion is: 33 esXAI, the query address is - https://arbiscan.io/advanced-filter?tkn=0x4C749d097832DE2FEcc989ce18fDc5f1BD76700c&txntype=2&mtd=0x86bb8f37~Claim+Reward
Therefore, the output of the pool in 30 days is: 7*3*750*33=519750 esXAI
So the daily output of the pool is: 519750/30=17325 esXAI
After determining the daily output of the pool, the daily income of "pool owner, KEY holder, esXAI staker" can be obtained:
Pool owner: Pool daily output * Pool owner-5% = 17325 x 5% = 866.25 esXAI
KEY holder: daily output of the pool * KEY acquisition ratio - 80% = 17325 x 80% = 13860 esXAI
esXAI staker: daily output of the pool * esXAI gain ratio - 15% = 17325 x 15% = 2598.75 esXAI
Daily income of a single KEY staker:
Percentage of pledged KEYs * Daily income of KEY holders
Daily income of a single esXAI staker:
The percentage of esXAI staked * daily income of esXAI stakers
Three users pledged different amounts of KEY and esXAI:
User A pledged 10KEY and 100,000esXAI
User B pledged 20KEY and 200,000esXAI
User C pledged 50KEY and 500000esXAI
Based on these conditions, we can calculate the respective daily returns as follows:
User A’s daily income consists of two parts: KEY-based output (184.8 esXAI) and additional income based on esXAI staked (259.875 esXAI), totaling 444.675 esXAI.
User B’s daily income also consists of two parts: KEY-based output (369.6 esXAI) plus additional income based on esXAI staked (519.75 esXAI), totaling 889.35 esXAI.
User C’s daily income is also composed of two parts: KEY-based output (924 esXAI) plus additional income based on esXAI staked (1299.375 esXAI), totaling 2223.375 esXAI.
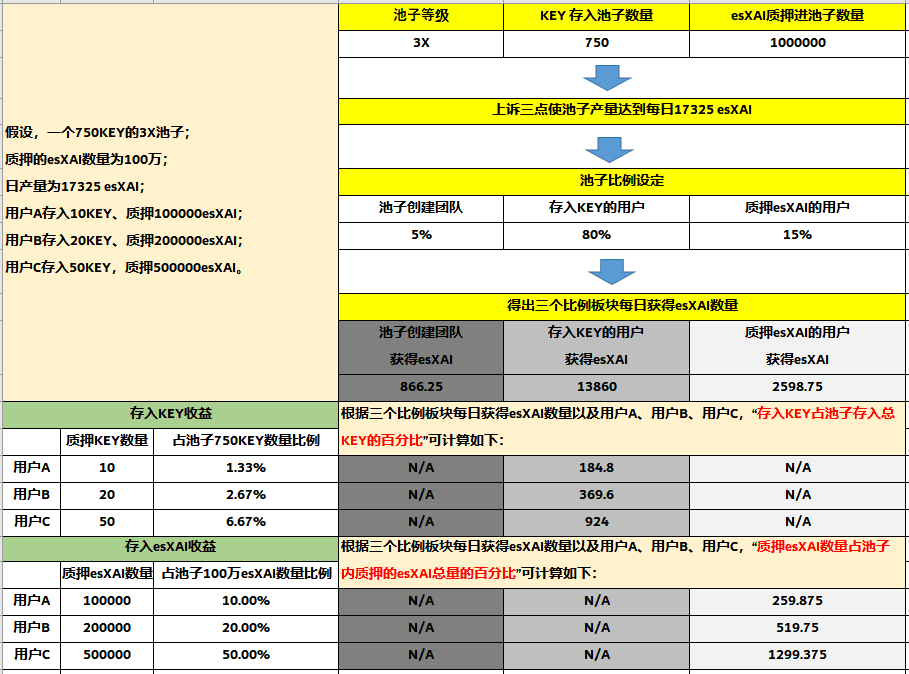
In summary, from the above cases, we can see that all parameters involved in the staking pool mechanism are variable, which means that the interaction between staking pool participants (including users who stake esXAI, KEY holders, and the pool itself) is essentially a process of both cooperation and competition. The output of the pool comes from the number of KEYs, and the setting of the pool ratio affects the income of the pool creator, KEY holders, and esXAI stakers. After understanding, we can get:
The income of the pool creator is related to the pool level, the number of keys in the pool and the pool ratio;
The income of KEY holders is related to the pool level and the proportion of KEY given by the pool;
The income of esXAI stakers is related to the pool level, the number of keys in the pool, the proportion of the pool given to esXAI stakers, and the proportion of esXAI deposited in the total amount of esXAI in the pool.
Regarding the esXAI staking income, let’s further explore:
When calculating the percentage, in X/(A+X), A is a constant and X is a variable. We can understand the impact of the relative size of X and A on the steepness of the percentage increase by analyzing the rate of change of this function:
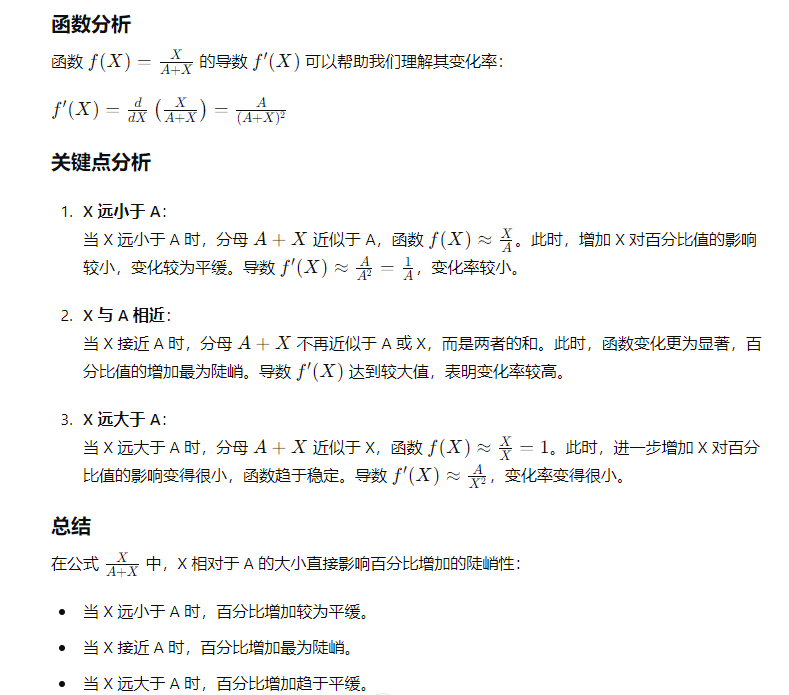
However, although this process is full of strategic considerations and games, I believe that pursuing a win-win strategy is the key to success. Through the sharing of wisdom and strategies, all participants can find their place in this ecosystem and achieve common prosperity.
When depositing KEY and staking esXAI, you should also pay attention to the online status of the pool.
When depositing KEY and staking esXAI, be sure to pay attention to the online status of the pool. If the pool is not online when the assertion occurs, the benefits of the entire pool will be lost. Therefore, whether choosing a pool or creating a pool, this should be taken into consideration.
Are there any other benefits for depositing KEY and staking esXAI?
In the recent XAI Q&A session, the core contributors of the project have made it clear that although the potential income and decision-making power of the XAI staking pool partially rely on third-party game companies, this mechanism brings additional airdrop opportunities to KEY holders and esXAI stakers. This setting can be compared to Binance's Launchpad, that is, all games on the XAI game chain may provide airdrops to KEY holders and esXAI stakers.
After years of ups and downs in the cryptocurrency industry, I personally prefer the model of "high probability of deterministic returns plus possible high returns". The XAI staking pool fits this model perfectly. The esXAI obtained from staking KEY and esXAI is regarded as a stable income, while the airdrops from third-party games are regarded as potential additional returns, providing a staking opportunity that is both stable and has growth potential.
Things to note when pledging
Whether you are staking KEY or esXAI, you need to wait 7 days to unstake. But here is a little trick: after staking, choose to unstake immediately, and you will see a gray "CLAIM" button. This means that after the 7-day waiting period for unstaking is over, the "CLAIM" button will become clickable. However, if you do not click "CLAIM" after 7 days, your assets will still be staked and continue to generate income. In this way, you can choose when to unstake, which is very flexible.

Choose a staking pool
🔥Disclaimer🔥: You must understand that it is your own responsibility to choose which pool to use. When staking, you should fully understand Xai's staking ecosystem and the situation of other pools on the market.
If you read the above content carefully, you can choose a good option for yourself. The staking pools have basically been developed to the present, and I choose to participate in the following staking pool communities, which are relatively stable and mainly because I can find people to ask questions:

Pool Discord: https://discord.gg/novadash
If you have any questions, you can go to Discord to communicate directly
Further reading:
#ARB #OffChainLabs #GameFi #XAI #Web3
appendix
🚀Part 1 (fade out)🚀
In fact, the process of getting a node up and running is very simple. As people become more familiar with this process, I expect the node ecosystem to grow and expand, covering various forms such as cloud servers, embedded systems, and proxy operation platforms. This article is mainly for beginners, and aims to introduce some basic and simple concepts to help you easily start the journey of running a node.
Special note: The node needs to access Alchemy's RPC service, so if your network cannot access www.Alchemy.com (for example, the network is restricted, similar to not being able to access Google), it is recommended to use a European and American cloud server.
Regarding the network rewards for a node authorization:
Official documentation: https://xai-foundation.gitbook.io/xai-network/xai-blockchain/sentry-nodes-explained/accruing-node-rewards
Translated:
To receive node rewards, a node delegate must participate in a challenge. The Xai network creates a challenge approximately every hour, which means there will be approximately 720 challenges per month). Each node delegate that participates in a challenge will receive esXAI network rewards in proportion to the estimated network rewards. In order to keep GAS fees reasonable, each node delegate has a 1% chance of being eligible to participate in the network challenge. Each participating node delegate will receive node rewards. Therefore, on average, each active node delegate will win approximately 7.2 times per month. In order to maximize the possibility of earning node rewards, it is strongly recommended that you run your node 24 hours a day, 7 days a week.
1. Operating system and computer configuration requirements
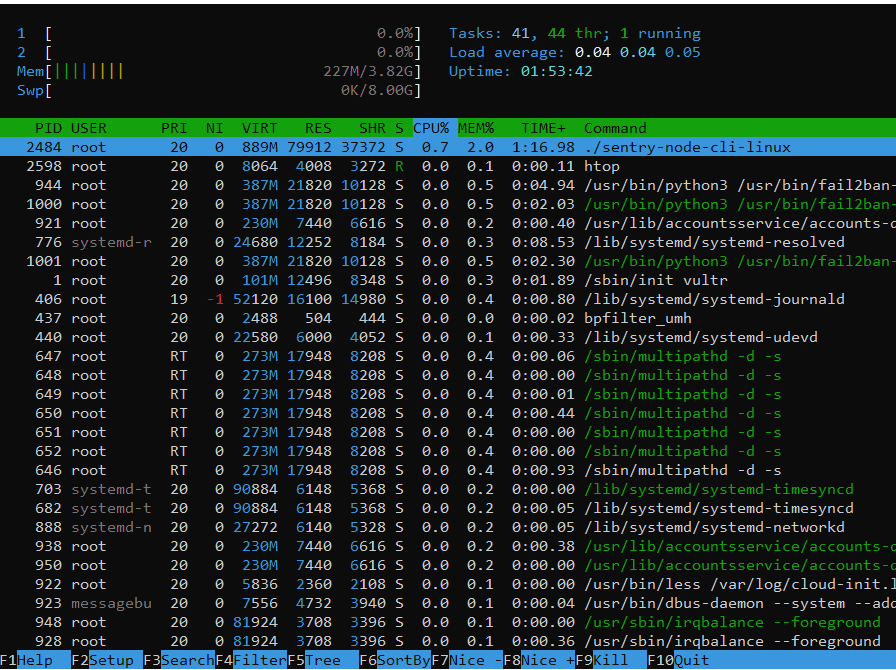
2. Node security concept
Here, I will briefly introduce the basic framework of node security to help you better understand and operate:
Importance of Wallet A: First of all, the wallet you use to purchase the node authorization, which we call Wallet A here, is extremely critical. The private key of Wallet A must be kept strictly confidential and must not be leaked or provided to others. Once the private key is leaked, the security of your assets will be at great risk. Although the node authorization (in the form of NFT) is bound to Wallet A and cannot be transferred, the coins you mine are stored in Wallet A. If the private key is leaked, others can transfer your coins.
The role of Wallet B: In the process of running a node, another wallet will be involved, which we call Wallet B (called Operator Wallet in Xai's official documentation). This wallet is automatically generated by the node program, or you can choose to import your own wallet. The main function of Wallet B is to pay the GAS fees generated during the mining process. GAS fees are usually very low. On the ARB platform, only about 0.005 ETH is needed to support a node authorization to run for a whole year. In order to ensure sufficient GAS balance, it is recommended that you recharge 0.006 ETH to Wallet B.
Overview of the relationship between Wallet A and Wallet B: In short, Wallet A is your main wallet, used to store your node authorization and mining income. Wallet B is the wallet used for daily node operations and paying GAS fees. The relationship and functions between the two are clear, ensuring the security and efficiency of operations:
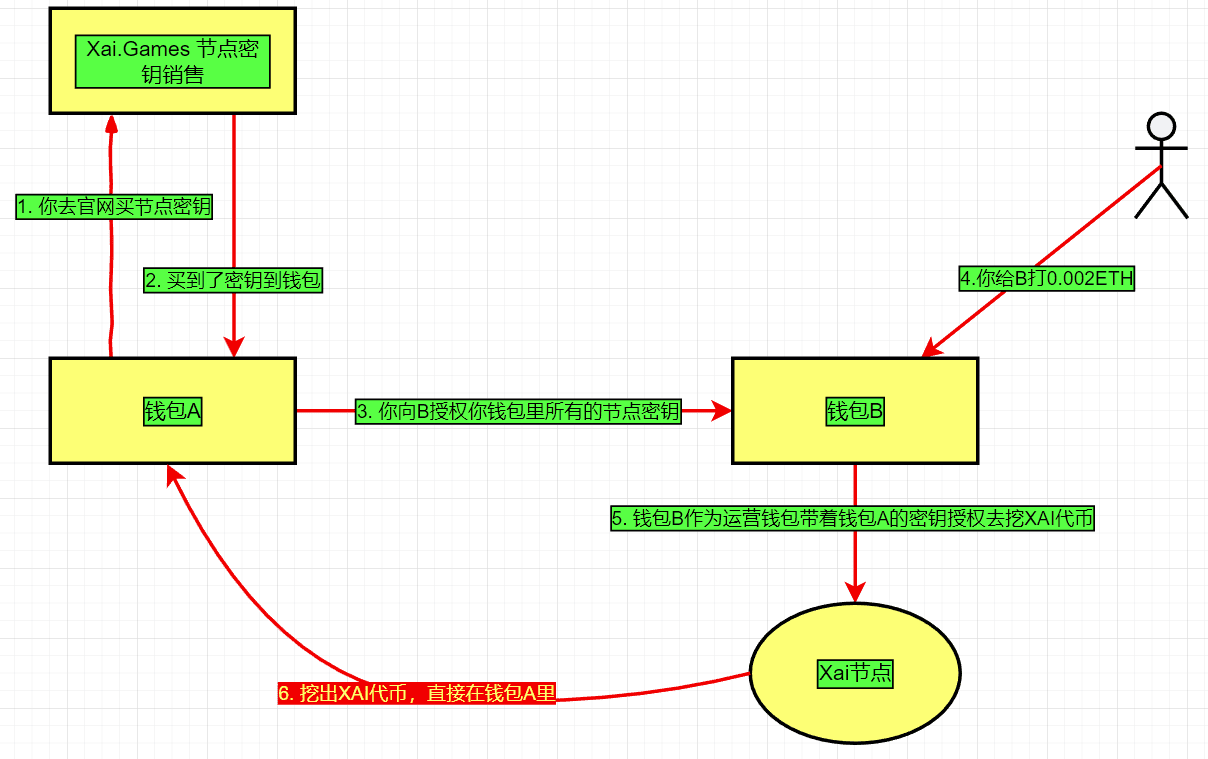
Summary of wallet concepts for node operations
Wallet A's core role: Wallet A is the primary wallet you use to purchase node authorization. In addition to storing node authorization, Wallet A also directly receives XAI tokens mined by the node. Since these tokens are directly deposited into Wallet A, its security is critical.
Function of Wallet B: Wallet B is a wallet loaded during the operation of the node. Its main function is to perform mining operations on behalf of Wallet A and pay the corresponding GAS fees. Although Wallet B is crucial to node operation, since its main purpose is to pay GAS fees, even if its security is compromised, it will not cause direct losses to your main assets (stored in Wallet A). Therefore, even if a small amount of funds of 0.006 ETH is stolen, there is no need to worry too much.
Wallet change operation: If you want to change wallet B to other wallets (such as wallet C, D, E, F), just let wallet A perform the same authorization operation on these new wallets. Please make sure that these new wallets also have enough ETH on ARB to pay the GAS fee, which is the same as the requirement for wallet B.
If you are familiar with this operation, I suggest you read this article to further deepen your understanding: Xai Node Running Tutorial: Multiple Wallets "A" Authorize Wallet B
3. How does wallet A authorize wallet B?
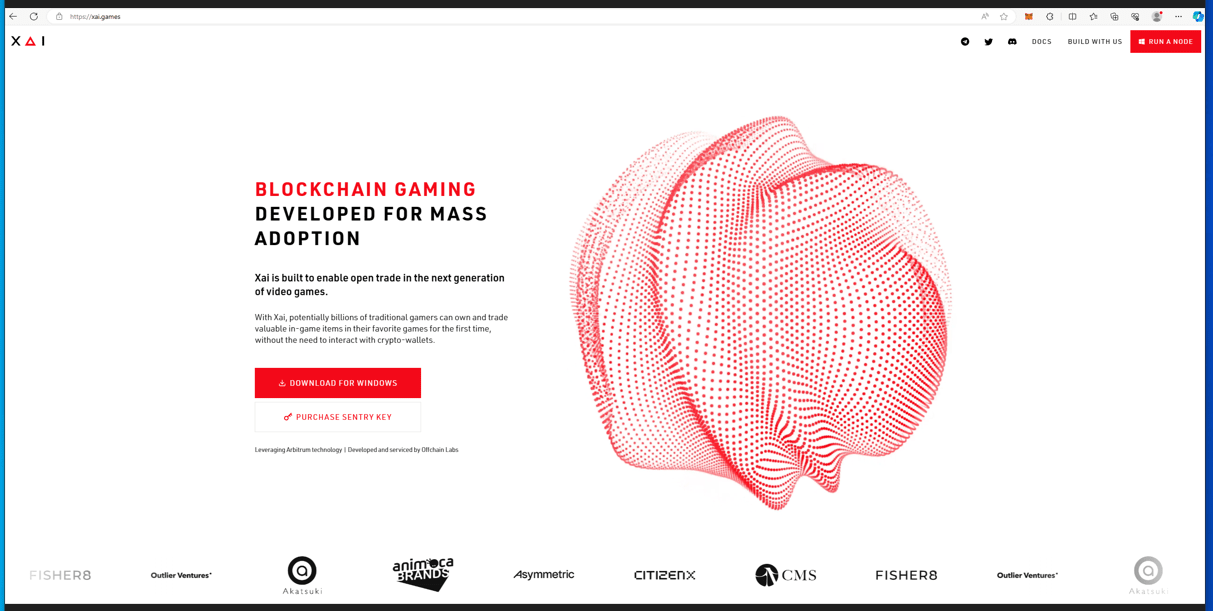
Download the node program: Visit the official website and download the node program for Windows.
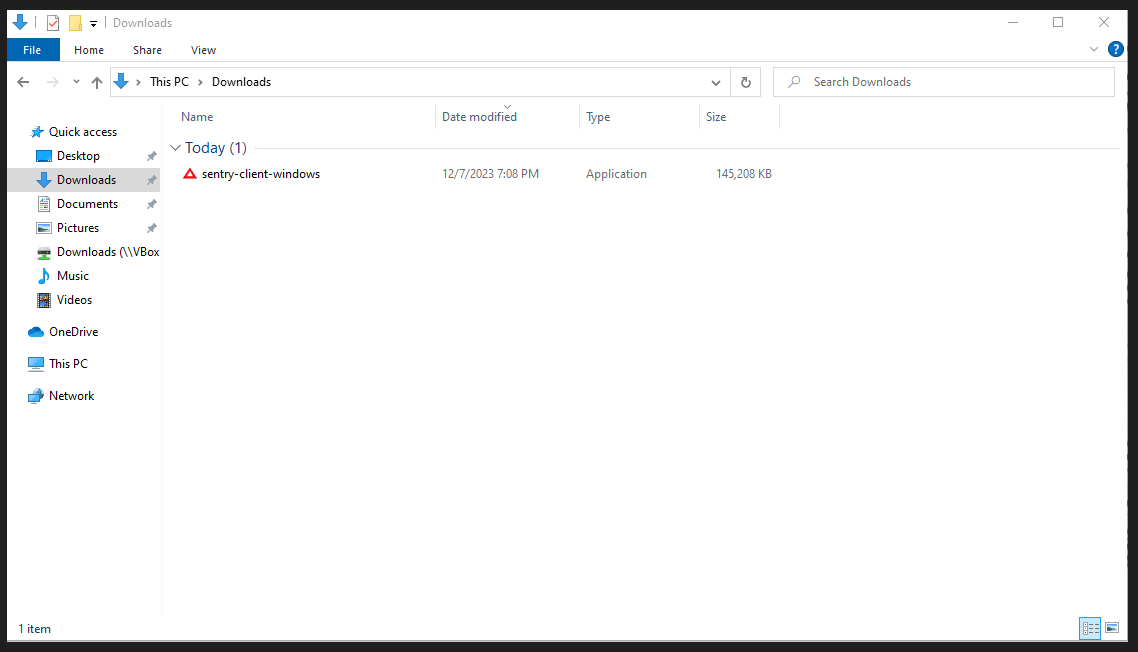
Installer: Find the downloaded node program file and double-click it to install.
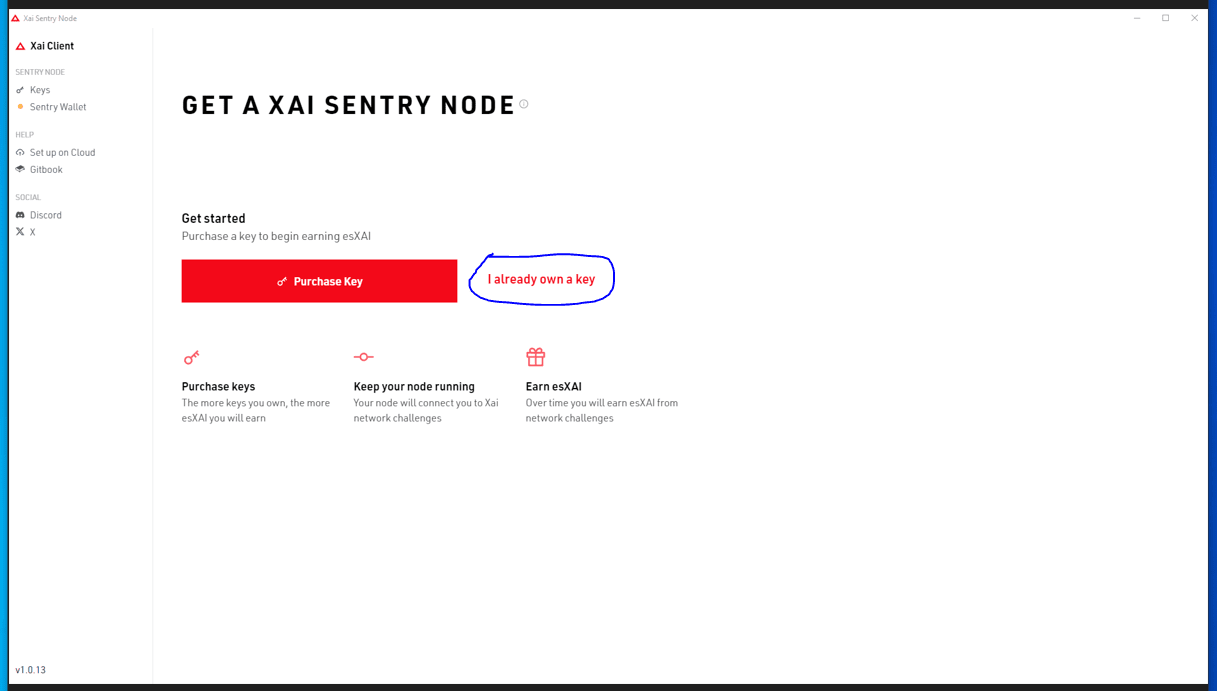
Start the authorization process: After the installation is complete, if you have already purchased a node license, select the "I already own a key" option. As shown below:
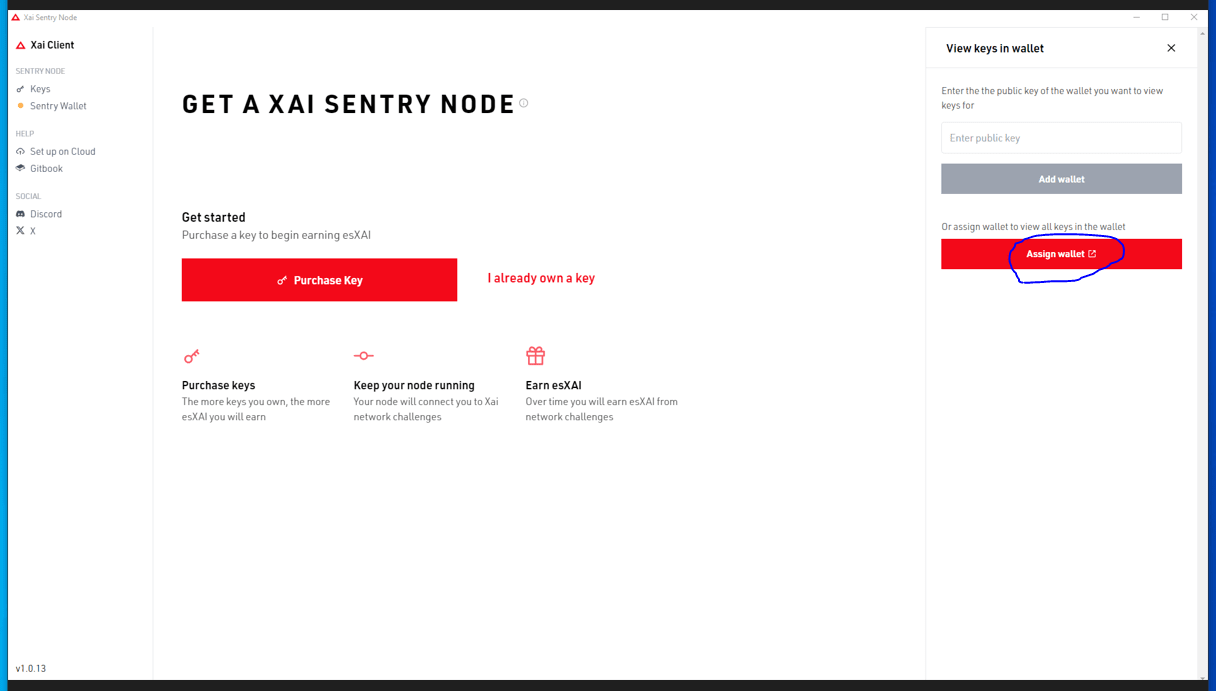
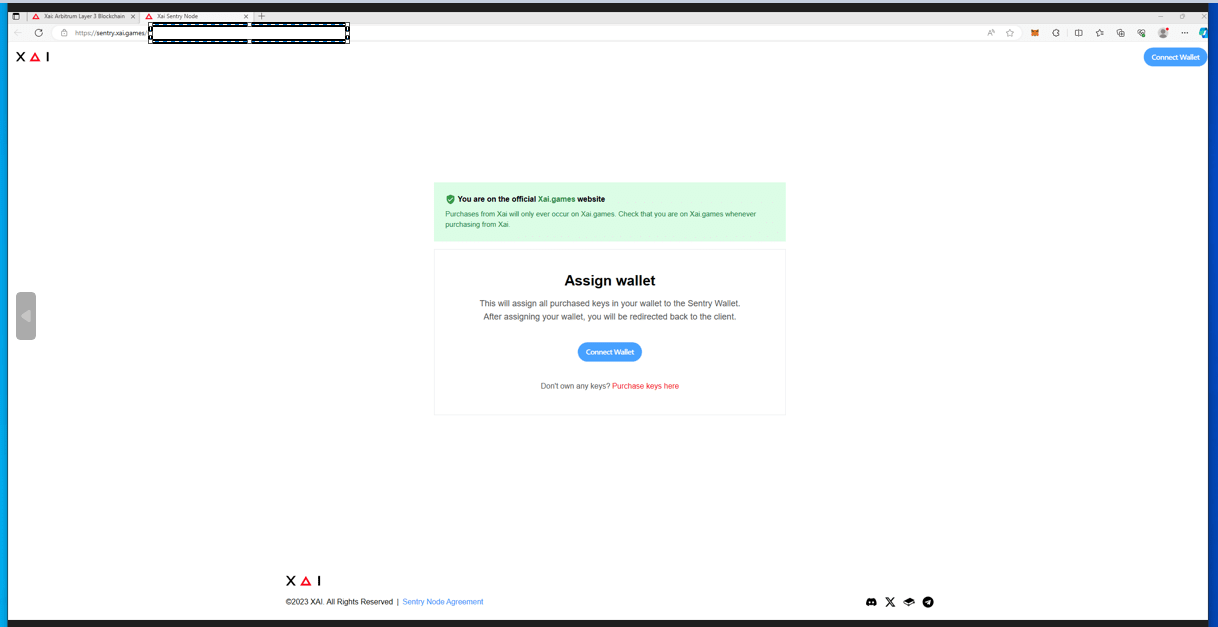
Select “Assign Wallet”: Click the “Assign Wallet” button to proceed to the next step. As shown below:
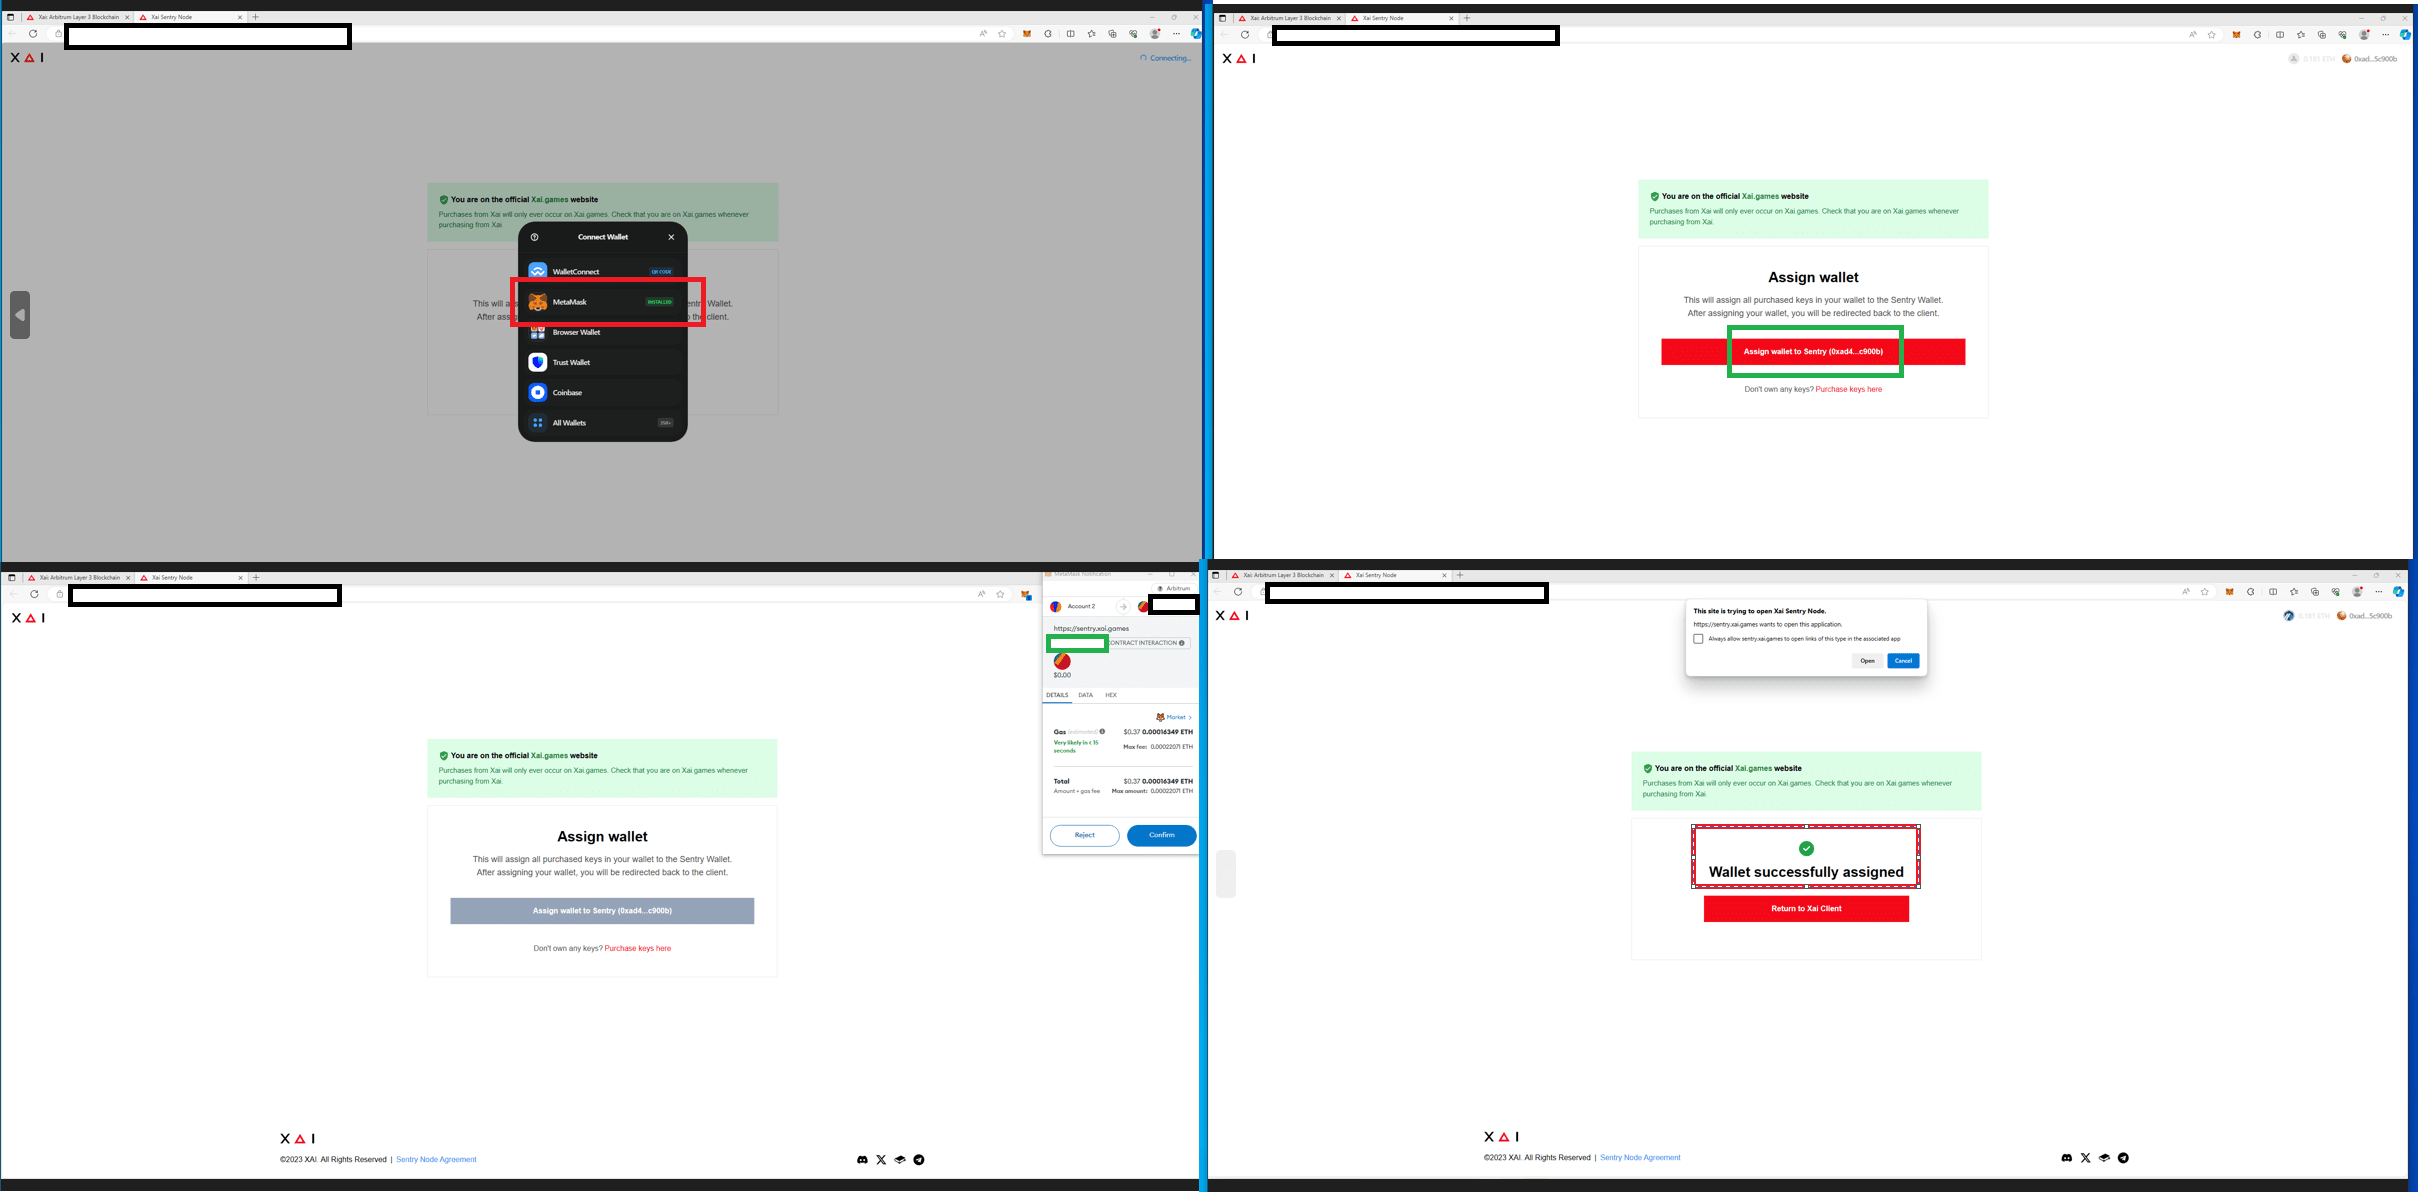
Connect and authorize your wallet:
The browser will automatically open, prompting you to connect to Wallet A.
Make sure that the wallet plug-in in the browser (such as MetaMask, also known as Little Fox) is loaded with wallet A that purchased the node authorization.
Switch your wallet to the ARB chain.
The node program will automatically generate wallet B (we will explain how to export its private key later).
Pay attention to the address displayed in the browser, this is the address of Wallet B, which you will authorize.
Deposit 0.005 ETH (or more, depending on personal needs) on the ARB chain into Wallet B to pay the GAS fee.
Important tips about Wallet B’s GAS fees and node rewards:
Transaction Fee (GAS): When wallet B triggers a transaction (TX) due to node rewards, it needs to pay GAS fee. On the ARB chain, the GAS fee for each transaction is approximately 0.0001 ETH.
Node reward frequency estimation: A node authorization can receive about 50 rewards within a year.
Official GAS fee recommendation: Based on this frequency, the official recommendation is to deposit at least 0.005 ETH into wallet B to cover one year's GAS fees.
In the case of multiple node authorizations: If you purchase multiple node authorizations, for example 10, the total number of rewards in a year is about 500. This means that the total GAS fee for wallet B is about 0.05 ETH.
Monitoring and recharge: You can monitor the GAS balance of wallet B by visiting the block browser of the ARB chain. If you find that the GAS balance is insufficient, you should recharge it in time to ensure that the node operation is not affected. For those users who do not mind recharging more at one time, you can choose to recharge more according to your personal situation.
Complete the authorization process:
Connect wallet A and follow the prompts to complete the authorization steps.
After successful authorization, you will see the prompt "Wallet successfully assigned" in the lower right corner of the interface, indicating that the authorization is complete.
4. How to obtain the private key of wallet B
Although wallet B is not valuable, it is necessary to obtain its private key for running the CLI version of the node. The following are the steps to obtain the private key of wallet B (the wallet you authorized previously) automatically generated in the Xai node desktop program:
Start the Xai program: Open the Xai Windows node client program. In the program interface, find and click "Sentry Wallet".
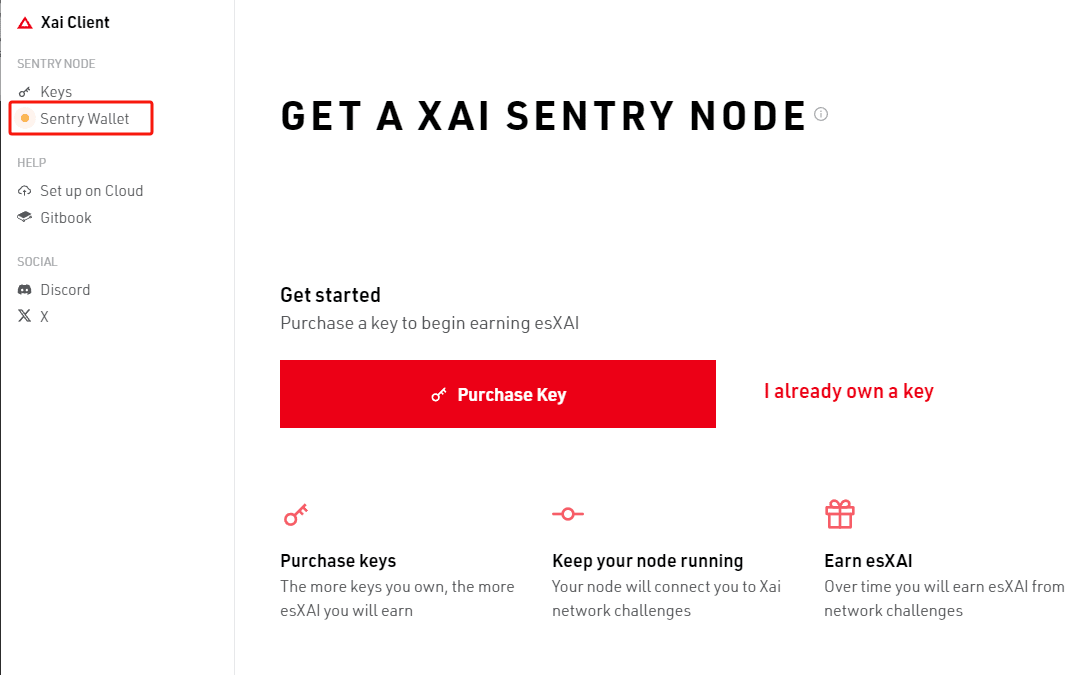
Export private key: In the "Sentry Wallet" interface, click the three dots. Select the "Export Sentry Wallet" option in the pop-up menu. As shown below:

Copy the private key: The program will display the private key of wallet B. Please copy this private key carefully and keep it properly. Remember not to disclose this private key to others.

5. Run the Windows Client node program
Before we start talking about the CLI wallet, let’s talk about the Windwos client program. For beginners, the officially recommended Windows client program is an ideal choice for starting and running a node. Here are some key information and operation guides about the program:
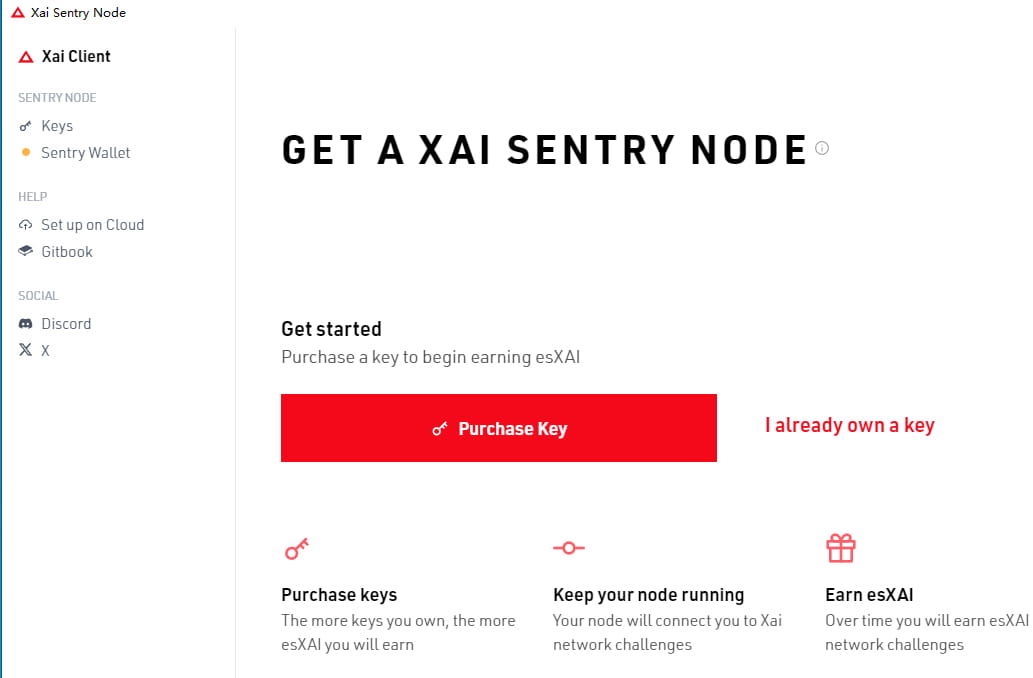
Program Overview: This client program is provided by the official website and is designed to simplify the node operation process. As of December 8, 2023, this program is still being updated. Therefore, users may encounter some minor problems, such as the program suddenly closing, the interface showing loading animation for a long time, or no response.
Community reaction: Due to these minor issues, some members of the community began to worry about whether the program would run successfully. This is also the reason why the Windows CLI (Command Line Interface) node program was introduced later. Unlike the client program, the CLI method is more focused on mining itself and does not have many additional features.
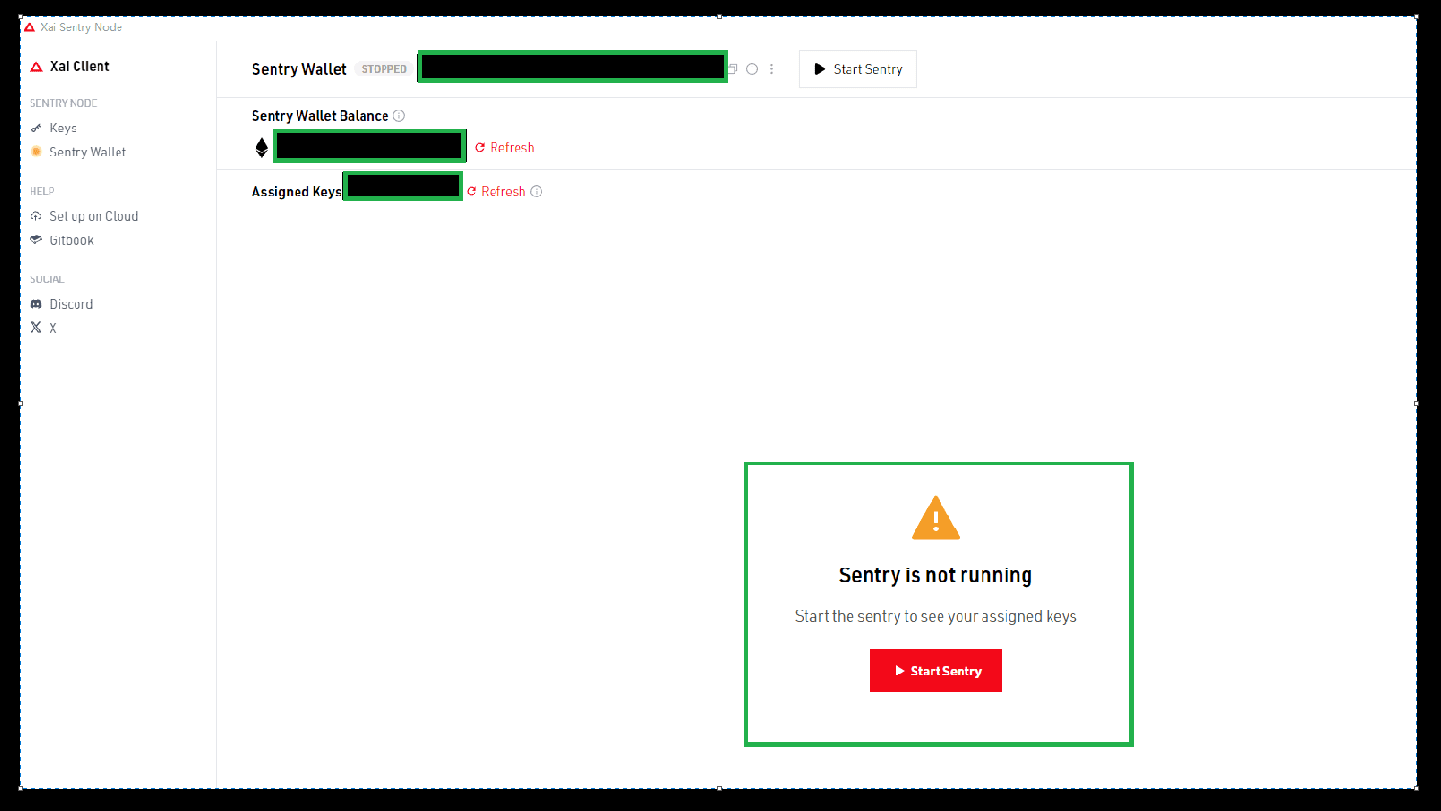
Advantages of the client program: Although there are sometimes some minor problems, for most beginners, the Windows client program is still the first choice. The use process is very simple: After completing the authorization of "Wallet A" to "Wallet B", the user only needs to click the "Start Sentry" button in the green box on the interface. As shown in the following figure:
Easy to operate: After that, the operation of the program is very intuitive, and users can easily view and manage their mining income by just clicking on the interface.
Starting from version 1.0.34, a new feature has been added, where wallet B can choose which wallets A to run nodes for. This is mainly to prevent someone from maliciously authorizing wallet B and then consuming wallet B's GAS to run nodes for themselves. Therefore, "multiple" wallets "A1, A2, ... An" can authorize wallet B, and wallet B can run nodes for these A1, A2, ... An, wallets.
Under normal circumstances, you should only see your wallet B and wallet A. Just check them and click Apply. If someone has authorized your wallet B without your consent and tries to make your wallet B run a node for him and consume your GAS, then you can just uncheck him. For more information, please refer to: How to see the KYC button on the Xai sentinel node after version 1.0.34?
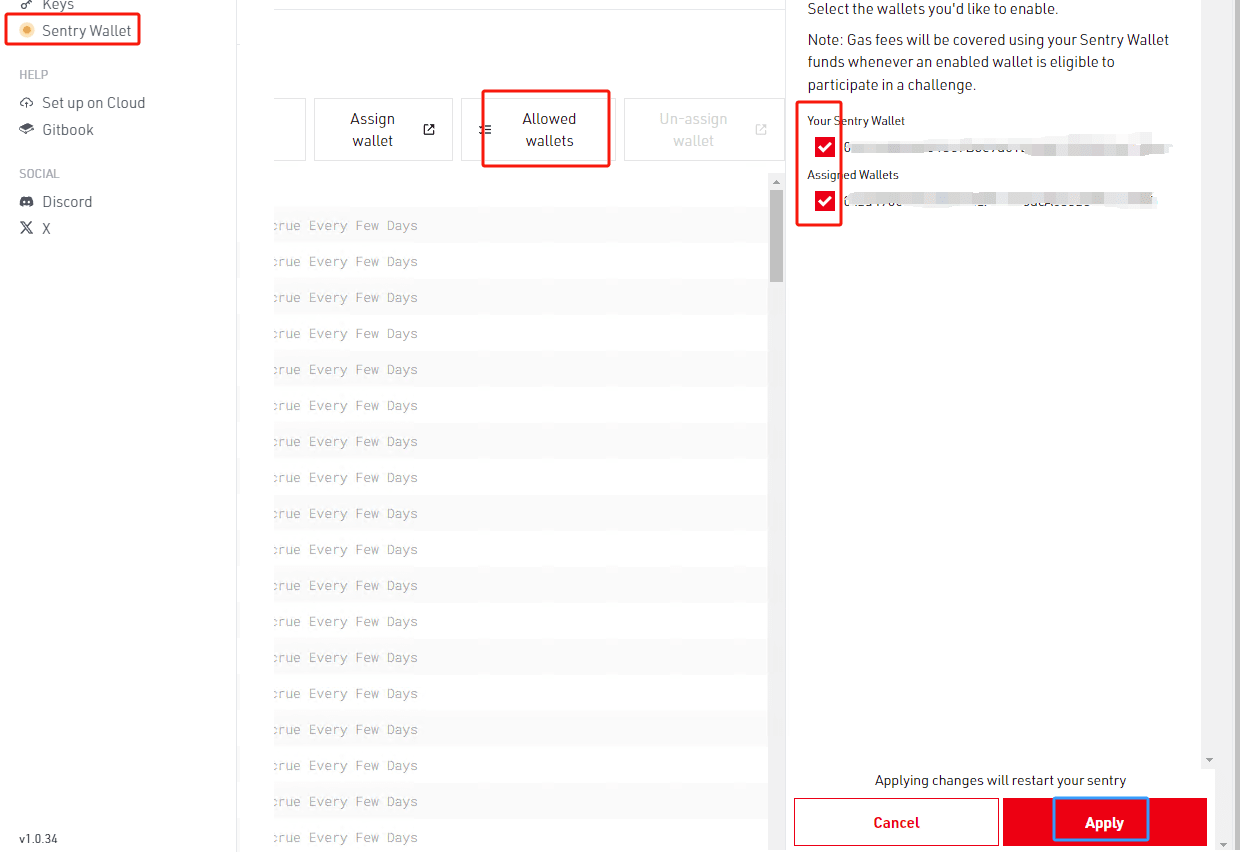
Set which wallets A run nodes
6. Run the Windows CLI node program
Note: Before running the CLI program, make sure to close the Windows client program. Running both programs on the same computer may cause errors.
Download the CLI program:
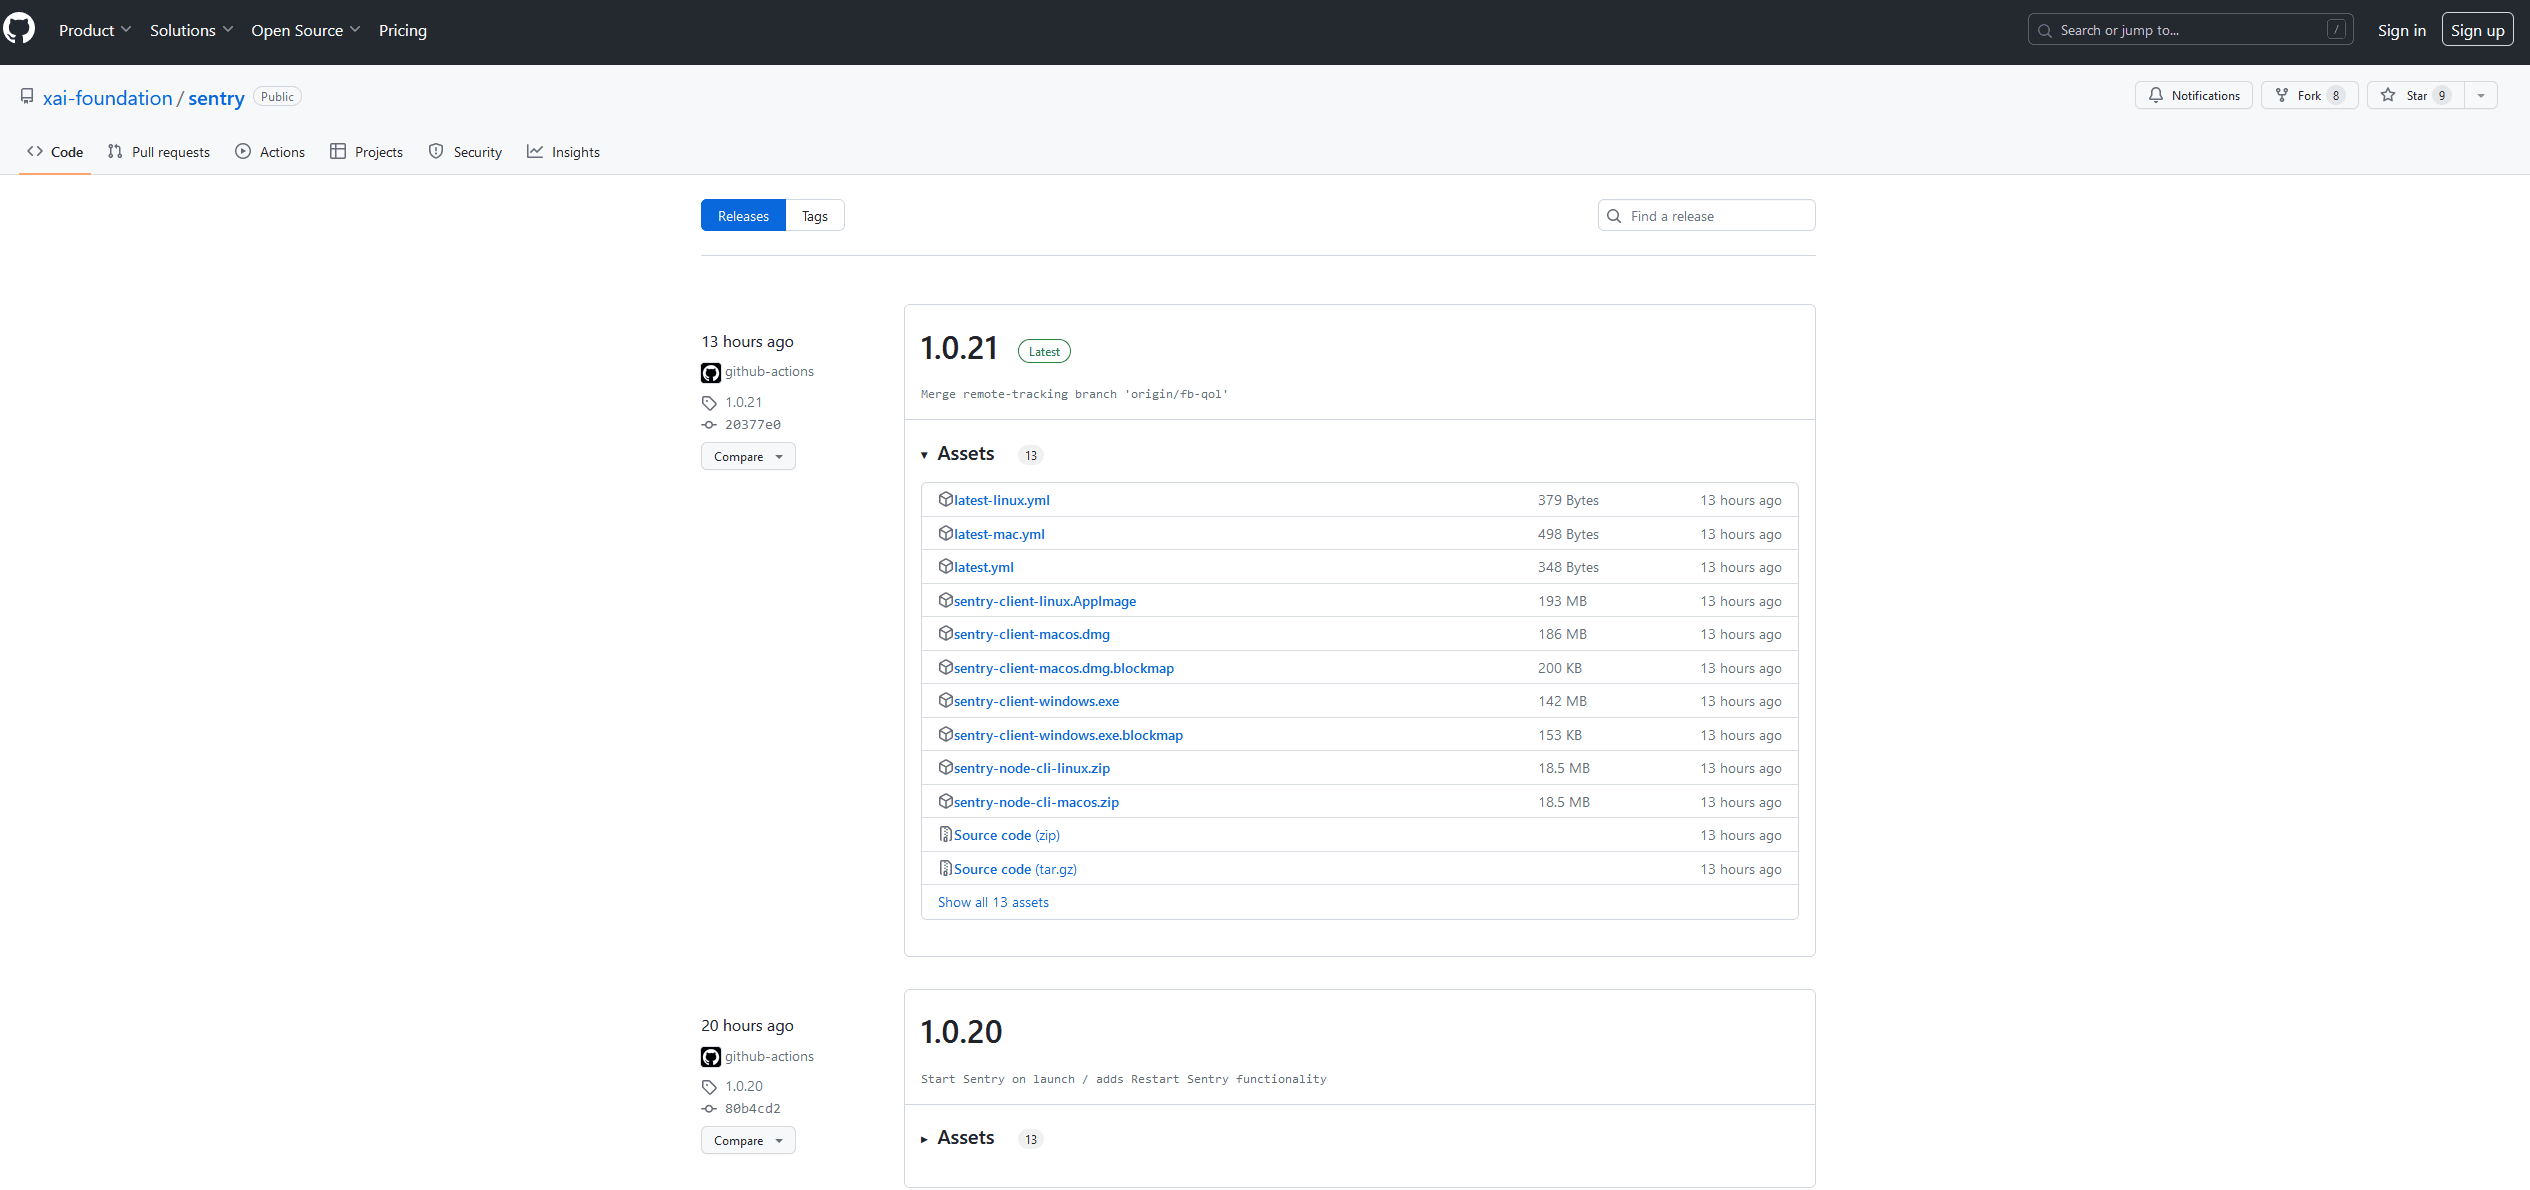
Visit the software repository: Please go to https://github.com/xai-foundation/sentry/releases to download the latest version of the CLI program.
Version information: The current version is 1.0.23, but please note that the program is constantly updated. To ensure that you are using the latest version, it is recommended to check the official announcement regularly and visit the above link from time to time to get updates
Stay updated: As the project develops, new versions of the CLI may be released. For optimal performance and stability, it is important to check for updates regularly and download the latest version in a timely manner.
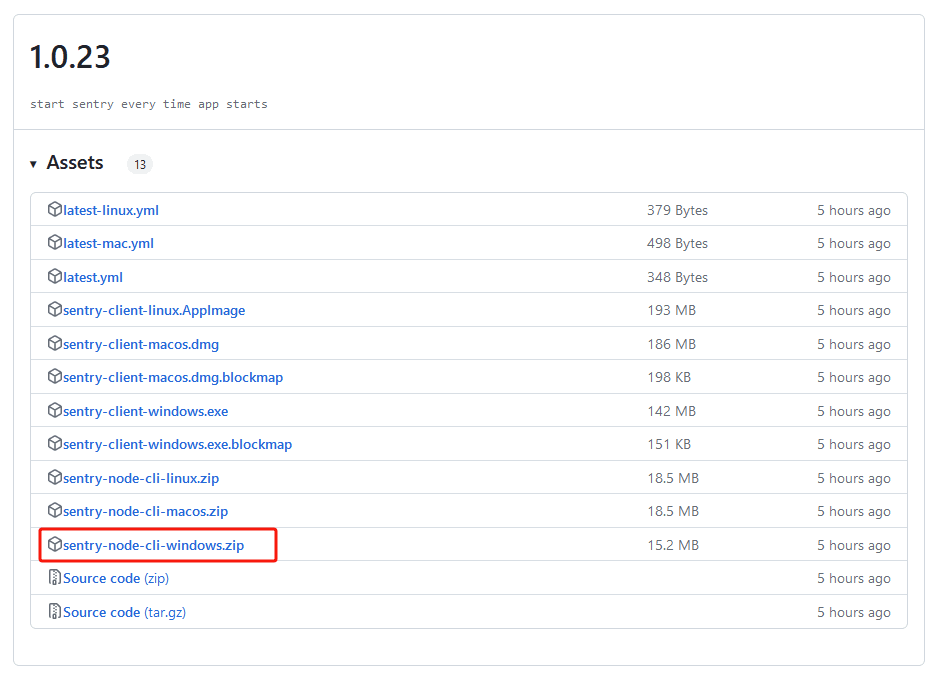
Find and start the CLI program:
Find the program file named sentry-node-cli-win in the unzipped folder.
Double-click the file to start the CLI node program.
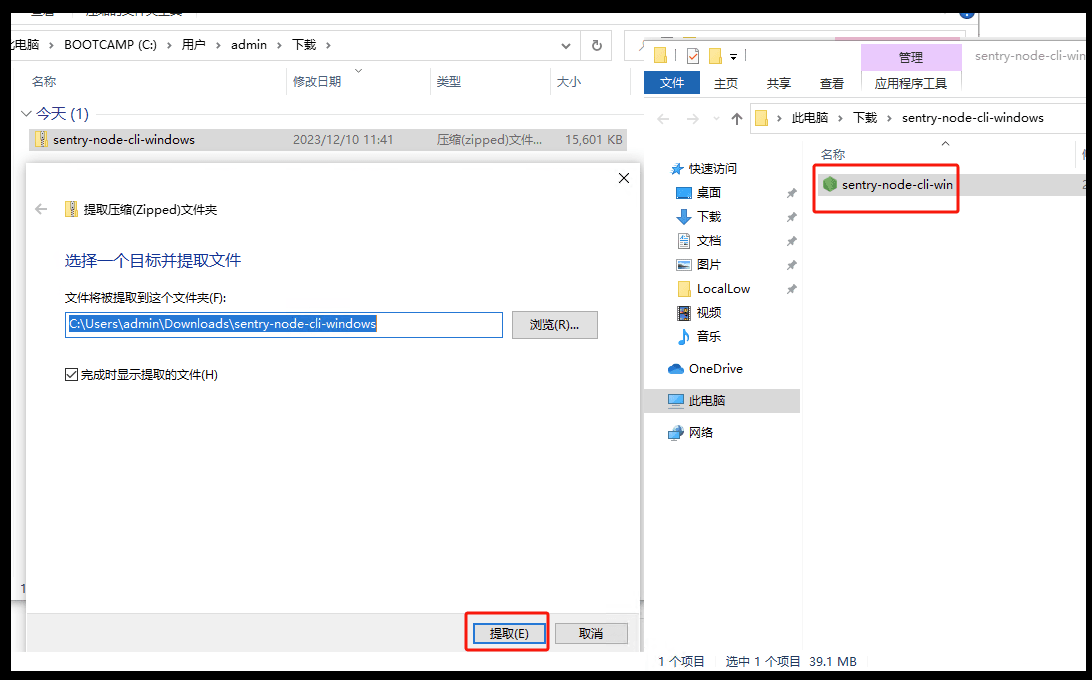
Initialize the node:
In the program interface, type boot-operator and press Enter.
Next, you will be prompted to enter your private key. You should enter the private key of wallet B obtained earlier.
In the CLI interface, right-click to paste the private key (note: using Ctrl+C will exit the program).
After pasting, press Enter to confirm. If the system reports an error, it is likely due to an error in copying the private key. In this case, you need to copy and paste again.

Starting from version 1.0.34, a new feature has been added, where wallet B can choose which wallets A to run nodes for. This is mainly to prevent someone from maliciously authorizing wallet B and then consuming wallet B's GAS to run nodes for themselves. Therefore, "multiple" wallets "A1, A2, ... An" can authorize wallet B, and wallet B runs nodes for these A1, A2, ... An, wallets. For more information, please refer to: How to see the KYC button on the Xai sentinel node after version 1.0.34?
After entering the wallet B key above, you will see a message “Do you want to use a whitelist for the operator runtime? (y/N)”. Press y and press Enter:

Select your wallet A and B
Normally, you should only see your wallet B and wallet A. Press the up and down arrows to select the wallet and check the box next to it and click Apply. If someone has authorized your wallet B without your consent and tries to get your wallet B to run a node for him and consume your GAS, then you can just uncheck it. After selecting, just press Enter:

Waiting for the system to load:
After entering the private key, the system will start loading relevant information. This may take some time, please be patient.
After successfully loading, you should see an interface similar to the one shown below.
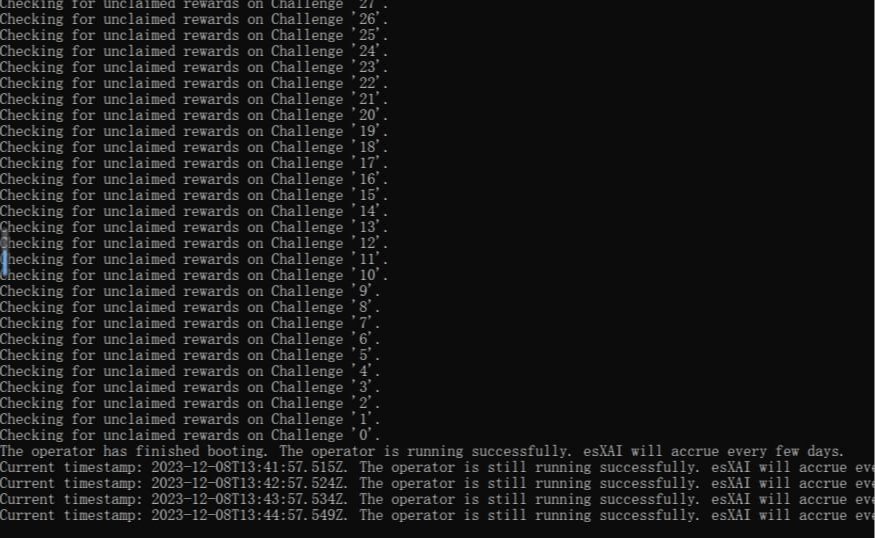
Notes and follow-up operations:
Due to the nature of the CLI interface, be careful when pasting to avoid accidentally exiting the program.
Once you have completed the setup, let the program run in the background without further action.
Considering the stability issues of Windows client programs, the CLI method is currently the most stable choice for running node mining.
Once you are familiar with the whole process, you can choose to run the node using CLI or client method according to your personal preference.
Please remember the previous content about "2. Node security concept" to ensure the safety of your operation.
7. Run the CLI node program on the Ubuntu server
If you use a cloud host, I recommend using Ubuntu Server because it is very stable in testing. Try to choose a non-domestic node to avoid Internet restrictions, such as Singapore, Japan, South Korea, Germany, etc. The choice of cloud host service provider can be determined based on community discussions. For how to use a cloud host to set up an Ubuntu server, please refer to: How to use a VPS to create an Ubuntu server to run a Xai node
1. Choose the appropriate cloud host configuration:
For users with 10 or fewer node authorization keys: Select a cloud host with 1 CPU and 1G memory.
For users with 10 to 80 node authorization keys: select a cloud host with 2 CPUs and 2G memory.
For users with 100 to 200 node authorization keys: select a cloud host with 2 CPUs and 4G memory.
2. Select Ubuntu version: Ubuntu 20.04 LTS version is recommended.
3. Set up and update Ubuntu:
Use SSH to log in to the Ubuntu cloud host. If you don't know how to use SSH, you can search for it. There are a lot of information, and there are probably a lot of video tutorials on Bilibili. I won't discuss it here.
Execute the following commands one by one, waiting for each command to complete before executing the next one:
If Chinese appears in the command, go to the article and turn off automatic translation, then click "View original text":
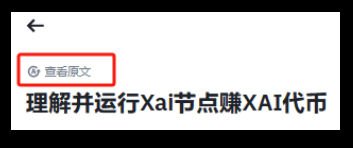
sudo apt-get update
sudo apt-get -y upgrade
sudo apt-get install -y screen wget unzip
After the above command is finished, restart. During the restart process, you will lose the SSH connection with the Ubuntu server:
reboot
4. Use SSH to connect to the Ubuntu cloud host and type the following commands one by one. Wait for the command to finish running before typing the next one:
screen -S xai
This command opens a Screen Socket so that even if you close the connection, the node will still run.
Then, go to https://github.com/xai-foundation/sentry/releases to find the latest CLI program:
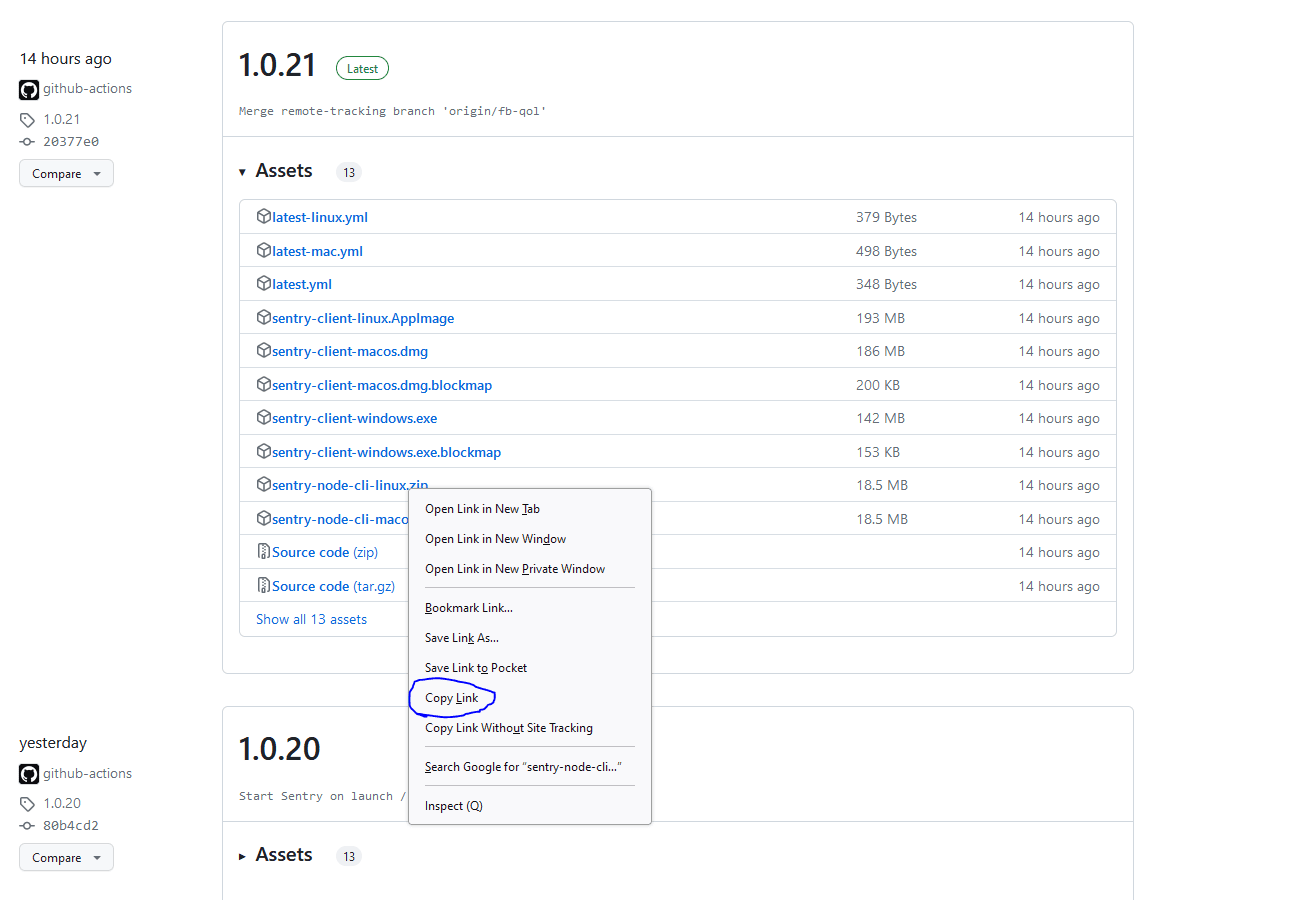
5. Find the Linux CLI program, right-click and select copy link, then continue to type the following command:
wget https://github.com/xai-foundation/sentry/releases/download/1.0.21/sentry-node-cli-linux.zip (wget, space, then paste in the link you just copied. The example downloads version 21. When I wrote this tutorial, it was the latest version)
This downloads the latest CLI program and then unzips it:
ls
Note: Use the ls command to check whether the download is successful.

unzip sentry-node-cli-linux.zip
Note: unzip is the decompression program
ls
Note: Run ls to see if the green program appears.

./sentry-node-cli-linux
Note: The above command is to start the node program

After the above commands are executed, you will enter the node program, and then it will be the same as "Run Windows CLI node program":
In the program interface, type boot-operator and press Enter.
Next, you will be prompted to enter your private key. You should enter the private key of wallet B obtained earlier.
In the CLI interface, right-click to paste the private key (note: using Ctrl+C will exit the program).
After pasting, press Enter to confirm. If the system reports an error, it is likely due to an error in copying the private key. In this case, you need to copy and paste again.

Starting from version 1.0.34, a new feature has been added, where wallet B can choose which wallets A to run nodes for. This is mainly to prevent someone from maliciously authorizing wallet B and then consuming wallet B's GAS to run nodes for themselves. Therefore, "multiple" wallets "A1, A2, ... An" can authorize wallet B, and wallet B runs nodes for these A1, A2, ... An, wallets. For more information, please refer to: How to see the KYC button on the Xai sentinel node after version 1.0.34?
After entering the wallet B key above, you will see a message “Do you want to use a whitelist for the operator runtime? (y/N)”. Press y and press Enter:

Select your wallet A and B
Normally, you should only see your wallet B and wallet A. Press the up and down arrows to select the wallet and check the box next to it and click Apply. If someone has authorized your wallet B without your consent and tries to get your wallet B to run a node for him and consume your GAS, then you can just uncheck it. After selecting, just press Enter:

6. You can now close the SSH window. If you want to connect back to see the node running status, use SSH to connect back to the Ubuntu server and type the following command to return to the node interface to view the status:
screen -r xai
Note: screen is a relatively important and simple command. If you are not familiar with it, you can search for a video on Bilibili or YouTube and you will learn how to operate it within 10 minutes.
7. If the subsequent program is updated, how to update it?
7.1 Connect to your server using SSH and restart the server:
reboot
7.2 After restarting, connect to your server using SSH, then type ls and press Enter. You will see two files:
sentry-node-cli-linux and sentry-node-cli-linux.zip

7.3 Enter the following command to delete them (the purpose is to delete the old programs, otherwise problems may occur):
rm sentry-node-cli-linux sentry-node-cli-linux.zip
Then repeat steps 4 to 6 above.
8. Common errors encountered by the community
8.1 If the following picture appears, there is a problem, close it and reopen it again:
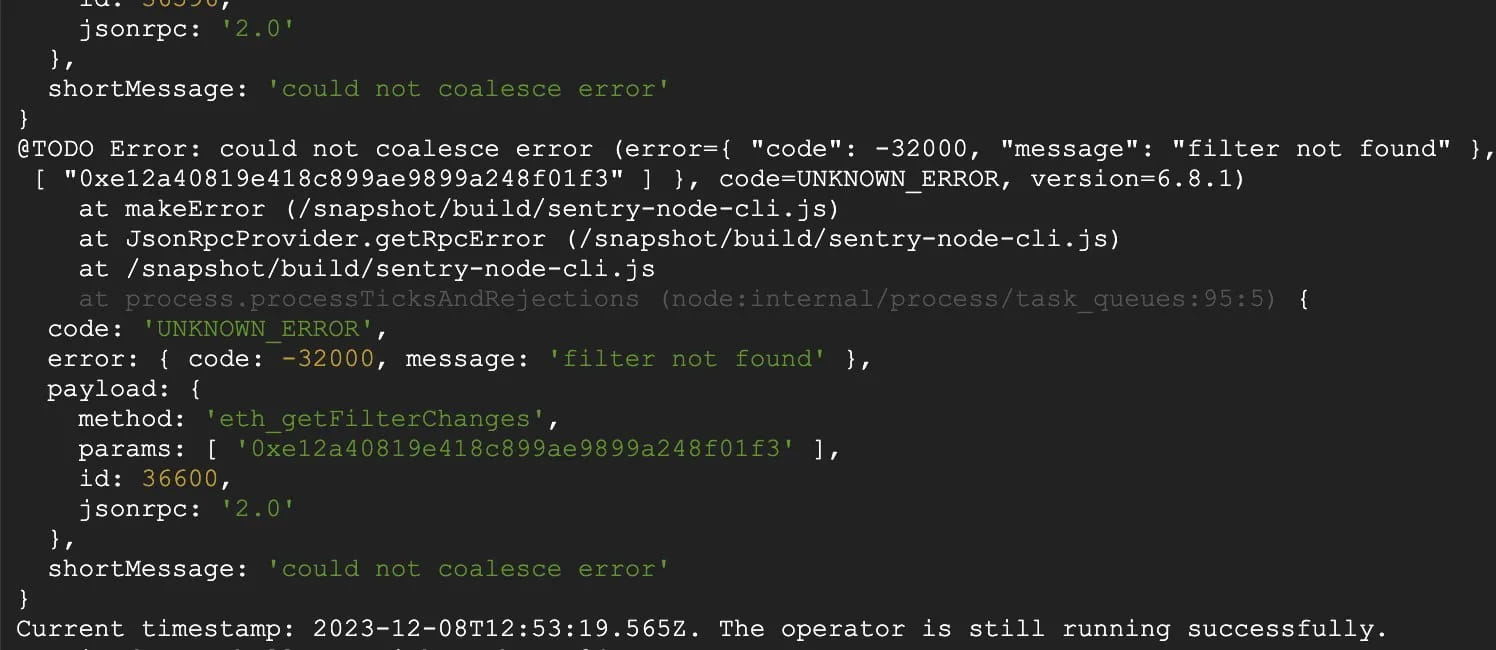
8.2 Why haven’t I mined tokens yet?
If you purchase a node license, you will typically earn rewards approximately every 7 days, so be patient and keep your node running for a few days.
8.3 Personal suggestions for Wallet B
For users who use the Windows client and do not plan to try the CLI mode, I recommend backing up the private key of wallet B. If the program is deleted, damaged, or uninstalled, the new wallet B generated when the Windows client is reinstalled will not be the original one. If you do not back up the private key, you will need to re-authorize this "new" wallet B, which will result in the loss of the authorized GAS of the original wallet A and the GAS ETH previously deposited in wallet B. Although the amount is not large, it is still worth noting.
8.4 How to update the CLI wallet?
Updates to the CLI wallet must be done manually. Although the speed of version iteration has slowed down, if there is an update, you still need to visit https://github.com/xai-foundation/sentry/releases/ to download the latest corresponding CLI program.
8.5 GAS consumption of wallet B
When the node wins the reward, wallet B will initiate a transaction (TX). On the ARB chain, the GAS fee for such a transaction is approximately 0.0001 ETH. Based on the following estimates and official recommendations:
GAS consumption for single node authorization: For a single node authorization, it is expected to win about 50 rewards in a year. Therefore, the official recommendation is to deposit about 0.005 ETH in wallet B as the GAS fee for one year.
In the case of multiple node authorizations: If you purchase multiple node authorizations, such as 10, the total number of rewards in a year is about 500. Accordingly, the total GAS fee of wallet B will require about 0.05 ETH.
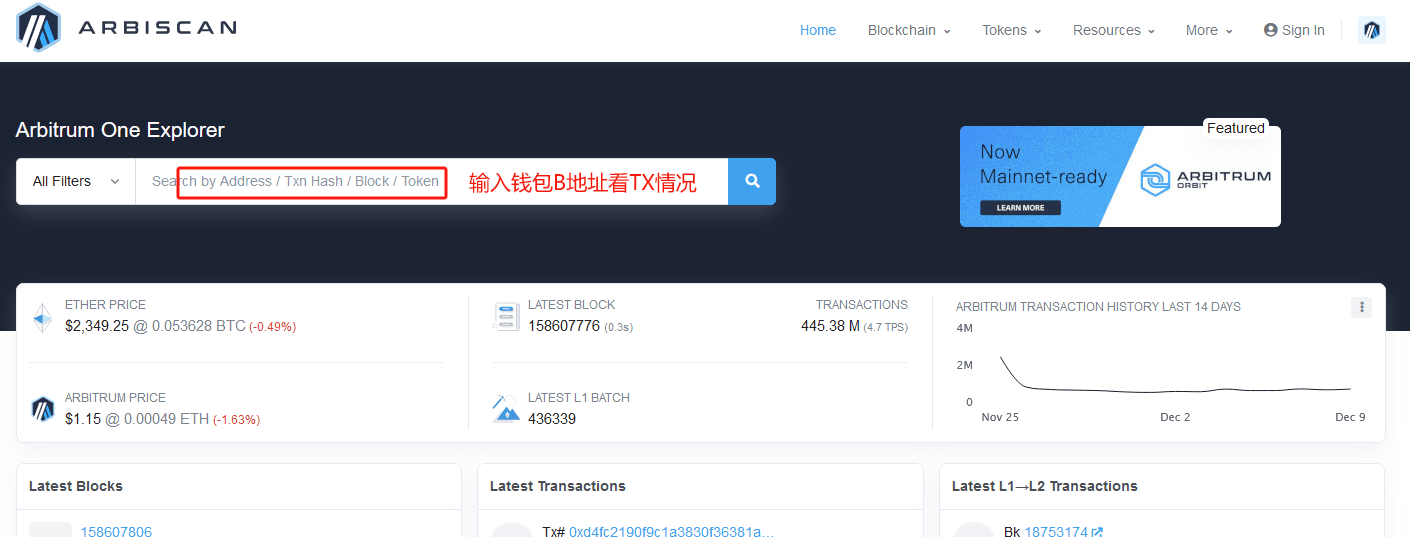
Monitor and manage GAS balance: You can monitor the GAS balance of wallet B by visiting the block explorer (Arbiscan) of the ARB chain. If you find that GAS is insufficient, please recharge it in time to avoid affecting mining operations. For those who do not mind recharging more at one time, you can choose to deposit more ETH.
ARB Block Explorer: https://arbiscan.io/
8.6 If you enter the correct private key of wallet B, but the following picture appears, community members reported that the problem was solved after turning off IPv6.

8.7 If you use a third-party tool to check the block status of the node and find that there is a Miss, or the display in the wallet is incorrect, a brother in the community asked and the reply is as follows:

