
1. TAIKO Introduction
ZK-Rollups scale computing by executing, aggregating, and proving transactions off-chain and relying on Ethereum for proof-of-data availability and validity verification. The biggest drawback of ZK-Rollups currently in production is that they do not fully support EVM's generalized computation, but are mostly application-specific. This breaks compatibility with existing Ethereum L1 smart contracts and dapps, and further makes it difficult to build new smart contracts and dapps that offer the same type of composable, expression-rich capabilities.
The Ethereum equivalent of ZK-Rollups, sometimes called ZK-EVMs, are the holy grail of layer-2 scaling solutions because they don’t compromise on security or compatibility. Recent claims are that TAIKO aims to be a Type1 ZK-EVM, i.e. prioritizing perfect EVM/Ethereum equivalence over ZK proof generation speed.
TAIKO consists of three main parts: the ZK-EVM circuit (used to generate proofs), the L2 Rollup node (used to manage the Rollup chain), and the protocol on L1 (used to connect these two parts for Rollup protocol verification) .
2. Cloud hosting
Cloud servers have the following advantages: high availability, high scalability, global data centers (choose the appropriate IP address segment), easy configuration, and low cost
3. Minimum configuration for running Pover in the current version
CPU: 8/16 vCore, RAM: 32GB, SDD:80GB, OS: Ubuntu 20.04
4. Use Hetzner cloud hosting service
(1) Click "Sign Up" to register an account

(2) Click "REGISTER NOW"

(3) Fill in your email and password according to the prompts
 (4)填写下KYC
(5) Click <+ New project> fill in the name, then in the “new page”, click “Add Server
”

(6) Select a region (it is recommended to use a data center in Germany), select the minimum parameters according to the hardware parameters mentioned above (the higher the performance parameters, the higher the charge), give the server a random name, and then click "create and buy"


NOTE: An email will be sent with your server information, such as IP address and password, please check your email and use this information to connect to the server.

5. Connect to the server
It is recommended to use Putty:
Search the Internet, download and launch the application yourself.
Use information sent to your email address.
Copy the IP and enter it into the application and click the "Open" button.
Click the "Accept" button and enter the username and password sent by Hetzner.
Note: To paste any command that you have copied, just right-click where you want to paste the command.


Enter or paste your password again, enter your new password and confirm your password again.
 如上图,已经进入服务器。
6. Debug the server
Enter the command:
sudo apt update && apt upgrade -y

Enter the command to install some preset packages:
sudo apt install pkg-config curl git-all build-essential libssl-dev libclang-dev ufw
Enter the command to install Docker:
sudo apt-get install ca-certificates curl gnupg lsb-release

Enter the command to install Docker official GPG key
sudo mkdir -p /etc/apt/keyrings curl -fsSL https://download.docker.com/linux/ubuntu/gpg | sudo gpg --dearmor -o /etc/apt/keyrings/docker.gpg
Enter the command to set the installation source path
echo \ "deb [arch=$(dpkg --print-architecture) signed-by=/etc/apt/keyrings/docker.gpg] https://download.docker.com/linux/ubuntu \ $(lsb_release -cs) stable" | sudo tee /etc/apt/sources.list.d/docker.list > /dev/null

Set directory permissions
sudo chmod a+r /etc/apt/keyrings/docker.gpg
sudo apt-get update

Install the latest version
sudo apt-get install docker-ce docker-ce-cli containerd.io docker-compose-plugin
When prompted on the command line, press Y to confirm.

Install docker compose
sudo apt install docker-compose

Install Screen
sudo apt install screen
After the installation is complete, enter:
sudo screen -S KeithLoveCZ

At this point, the server environment is ready.
7. Set up your own TAIKO node in Alchemy
Alchemy searches for the website address. It should look like the picture below. Complete the registration and self-use node settings according to the screenshot below.


 关键就是要把上面红框里的HTTPS和WWS复制出来,后面配置TAIKO节点要用到。
8. Set up EOA wallet
Considering that some fans may have no idea about this topic, I would like to give you a little introduction.
Download and install Metamask wallet
Note: We need to export and copy the private key of the wallet, so be sure to use a new account or wallet with no balance, only on Taiko nodes.
If you don't have the Little Fox Wallet, you can download and install it from the Chrome Web Store, open it and create an account (don't forget the account only for the Taiko testnet).
If you have already installed Taiko, please open and create a new account (don't forget the account only for Taiko testnet).
New accounts can be created step by step based on the image:


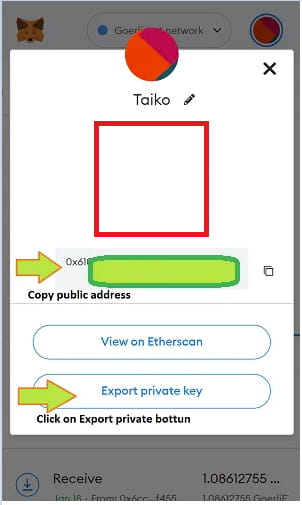
Export private key
Export the account's private key, then copy the information into Notepad and save it for the next step. You can use the links or images below to get to the final steps.


9. Lead the water
To become a certifier, you must own some ETH on Sepolia (a test network for Ethereum, on which the TAIKO test network runs). Use pk910's Lingshui website to apply, or leave a message and I will help you.

10. Install and operate Prover of TAIKO test network
Download node:
git clone https://github.com/taikoxyz/simple-taiko-node.git cd simple-taiko-node

Configure node:
cp .env.sample .env

Edit the configuration file with the following command and copy/paste the http/ws key saved in the previous step according to the example. The arrows in the image represent where to paste the key.
nano .env

Set the following environment variables to join the Prover competition:
Set ENABLE_PROVER to true (replace the default false with true).
Set L1_PROVER_PRIVATE_KEY as the private key of your wallet. As mentioned above, you need to have a certain amount of test ETH on Sepolia. If not, there will be no GAS to get rewards.

Press Ctrl + X, then type y on the keyboard and finally press ENTER key.


